Hey everyone, Wekhar here (Symphii in-game) with a guide for what I believe is one of the best LoR decks right now, Jax Vayne
Vayne . This flavor of Vayne leans heavily into using Equipment synergy to quickly dominate the board, and then beating down your opponent – which as Card Gamer notes in his Seraphine Ezreal Deck Guide, is especially good versus Seraphine piles. I recently climbed through Diamond to Rank #1 in the Americas server maintaining a 70%+ win rate over 39 games…
… and even though it appears simple, there’s a lot of nuance and skill expression in navigating the combat phases. Let’s take a look at the list!

21 cards

19 cards


Best LoR Decks: Jax Vayne – Card Breakdown

Champs and Followers
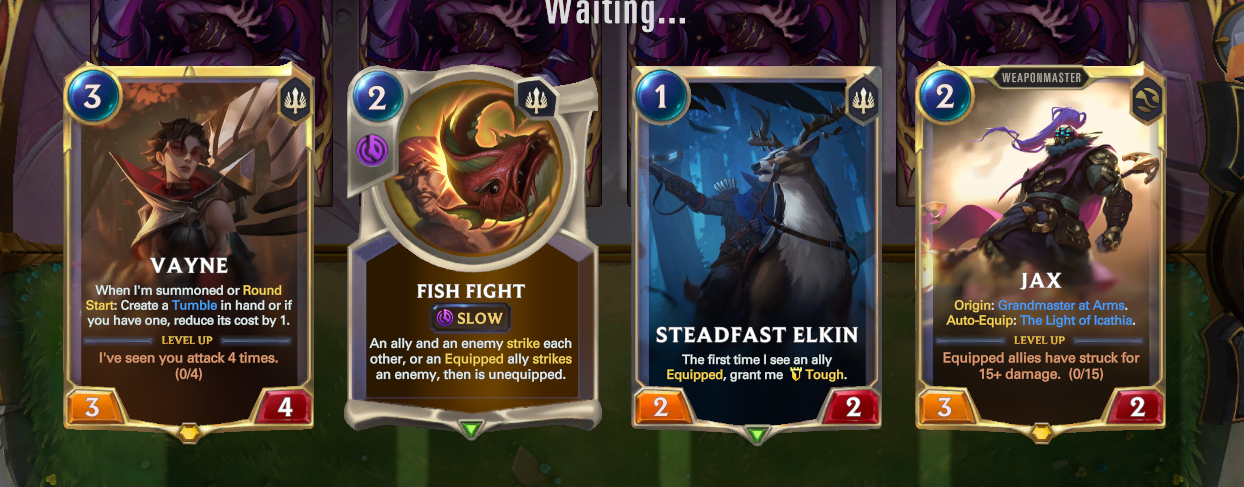
Vayne is definitely one of the stars of our deck, generating or discounting a Tumble every round, and forcing your opponent to respect your free attacks even when you don’t have the attack token. Also worth noting: casting Tumble on a Scout unit will let you Rally, and allow you to create even more pressure on your opponent to defend themselves. We’ll talk more about pressure later, as it’s the key to success when piloting Jax Vayne.
Jax is an extremely strong unit by himself. 3/2 Quick Attack is a great statline for a two-mana unit, and when he levels up, gaining Overwhelm and a lot of stats can be game-winning. And even when he dies, The Light of Icathia is a great weapon to equip on larger allies, such as Bloodcursed Harpy
 . A noteworthy interaction is that The Light of Icathia will permanently have Overwhelm after Jax levels up, even if it is not equipped on Jax. His Origin also allows us to run Weaponmasters, for more consistency in generating Equipment.


These Improvise followers generally have good stats and a strong ability after Improvising their Equipment, but their real value shines when they die. Once they die, the Equipment returns to hand to be used again for more free stats by Faithful Wolfdog , Bloodcursed Harpy, and Vayne’s Tumble, all of which equip, for free, an equipment that costs two or less! All your Improvised weaponry and maindecked Equipment costs exactly two, which makes these cards combo together perfectly.

These Domination followers really bring the deck together, alongside Vayne.
Steadfast Elkin will nearly always be a one-mana, 2/2 Tough unit, making it a really strong tool to put in chip damage – your opponent will often lack a good blocker or answer to a 2/2 Tough in the early rounds.
Faithful Wolfdog will usually be played as a one-mana 2/3 which Equips an Equipment from your hand for free, after an ally dies. This card is insanely efficient, allowing you to pay one mana for what is often a 4/3 or 4/4. Often, you’ll trade a Weaponmaster for an enemy unit to maintain a neutral board presence, then instantly gain a tempo advantage by re-equipping the Equipment of your fallen ally onto Faithful Wolfdog for extremely cheap.
Bloodcursed Harpy is really just an insane card. The Scout keyword becomes a Rally effect with Vayne’s Tumble, and it revives itself once when it dies, in exchange for destroying its Equipment. And did I mention that this monstrosity Equips itself for free when you play it? Often, this will be our big threat to close out the game, especially with a Fishawhack or The Fix-Em 5000
 , to either push through enemy chump blockers, or force our foe to sacrifice their units to not take massive amounts of damage. As a rule, Quick Attack is a better keyword for Harpy than Overwhelm if the opponent has a way to “kill” it, as it destroys its Equipment to survive, which means it’ll no longer have the Overwhelm keyword.
Spells and Equipment


Catch! is a generally good combat trick, with a baseline of +1/+1 for one mana, or more stats and keywords if you have an Equipment in hand, which is pretty common with the amount we’re running. You’ll usually use Catch to make your units survive removal, take favorable trades, and force your opponent to respect it in their gameplay: Catch's cheap cost allows it to be an omnipresent threat that your opponent has to consider, which is definitely valuable.
Riposte is a great combat trick in the mirror, and against decks that go bigger than we do. Generally, we’re using Riposte to turn a bad trade into a good one, where our opponent will block our smaller unit with a bigger unit, then have it die to Riposte while our unit lives. Riposte is also very strong when we're blocking, (to kill Quick Attack units) or to prevent Lifesteal, notably against Kayn and Varus
 decks.
Fish Fight is your main form of interaction, and you’ll almost always cast it with the one-sided strike option. This card excels at removing medium-sized blockers from your opponent’s board to set up good attacks, and the downside is almost negligible with the amount of cards in your deck that equip weapons for free, such as Vayne’s Tumble and Faithful Wolfdog.


Parts Made Whole is an extremely efficient card that ties the deck together, and makes sure you don’t run out of fuel. Since you’re almost always Discarding an Equipment to summon Icathian Mirage at Burst speed, the card is effectively a two-mana draw-two, since summoning a 3/2 is usually a two-mana statline. A very strong card to unbrick hands and get that last bit of damage in to close out games. You’ll often cast this at Burst speed before declaring an attack to send an extra attacker into the fray.
Golden Aegis has been a Demacian staple since release, with Rally being a strong mechanic. Usually, Demacia decks will run more than one, but with Vayne already generating Rally-esque effects with Tumble, you’ll often find yourself bricking when running multiple.


Demacian Tellstones is the spicy tech card that I absolutely love. It’s your Hail Mary play versus any bad matchup, or when you’re in a sticky situation. Detain is the most common option from Demacian Tellstones, to either stop an enemy attacker that’s hard to remove (such as Bloodcursed Harpy), or to remove a blocker to push lethal with your Overwhelm unit. For Demacia! is good for when you have an equal or wider board than your opponent, to force them to trade off their board unfavorably, and Prismatic Barrier can be useful sometimes, but not often.


The Darkin Aegis, or Joraal when you cast him for five mana, is very strong against any spell based deck. Tough is a superb keyword when dealing with Seraphine Ezreal
 Noxus, as it negates all of their ping spells. You’ll find yourself generally Equipping The Darkin Aegis on a unit with Tumble, or with Faithful Wolfdog, and then playing Joraal once said unit dies.
Joraal is a very good card as he demands your opponent to pre-commit their removal, since his ability jacks up the cost of your opponent’s spells higher than the current gas prices once you declare him attacking. Developing him on your opponent’s attack token to set up an open attack is a common and very strong line to destroy in-combat spell-based interaction like Mystic Shot , Concerted Strike
 or Vengeance
 .
.
Tech Options
Two Demacian Tellstones can be a good choice for beating the mirror and Pantheon decks, if that’s something common in your pocket meta.
Cataclysm can be an alternative to Golden Aegis, with good synergy when used on Quick Attack units and a conditional Rally when used on Scout units.
Zealous Ranger-Knight is a great option in general, potentially giving a disgusting amount of stats. I would honestly like to run this card, but oftentimes it can be worthless when you don’t have enough Equipment.
Ranger-Knight Defector is a Scout unit with Tough, which is just truly a pain to deal with. Basically being Bloodcursed Harpy Jr., it’s a very strong four-drop, especially when Equipped. The only issue with it is that running so many higher mana cost cards (Combat Cook, Parts Made Whole, etc.) makes you more likely to end up with bricked hands.
Jax Vayne – Improv 101
Every Improvised weapon can be useful in certain scenarios, but there are definitely those that shine more than others. Picking the right tool for the job (or gamestate) is a skill that separates the best from the rest. Let’s look at which equipment you should Improvise and when.
Top-shelf Equipment
These are the best of the best, and generally an instant pick for me whenever they’re offered:


Shepherd's Authority is one of the best weapons to Improvise, as it has the most stats. The downside of not being able to block is usually not one you have to worry about, as you’ll be doing the attacking most of the time anyways. Since we’re looking to reuse our equipment as much as possible, stats on our equipment will be very highly valued – more than Keywords in general. You should almost always take this one if it’s offered.
The Fix-Em 5000 is another very good weapon. Quick Attack is an extremely valuable keyword for decks that want to put on a lot of pressure and win the board, as it either forces your opponent to sacrifice units or take damage to their Nexus. It’s also risky to block and kill units with Quick Attack, as a buff spell can easily kill your unit and turn the tables. The lack of health makes this a less appealing option against decks with spell-based interaction, but it’s still a very good option regardless.
Combat Reel giving the free spell mana refill on attack is busted. It basically generates you mana for free, which as you can imagine is pretty darn good. It also has insane synergy with Tumble, which generates even more mana. The base statline of 2/1 is also not bad at all, which makes this another top-tier pick for me.
We'll Have to Make Due
This next category will consist of weapons that are situationally useful, and should generally be picked off your second or third Improvise units, unless you hit some of the better ones listed above.
Fishawhack is a good weapon against decks with a lot of chump blockers or smaller units, as they can’t effectively deal with the Overwhelm keyword. Eventually, a Bloodcursed Harpy or Vayne with a Fishawhack equipped and attacking relentlessly is going to beat them down. This weapon loses its potency when your opponent can have similar-sized (or, worst, larger) units that negate the Overwhelm. Really good into Seraphine piles, less so against Pantheon, Varus, or other Vayne decks.
Pan O' Pain is good against decks with pings or a lot of small units. I wouldn’t take this one otherwise.
Sandworn Amulet has an okay keyword and decent stats. It’s pretty good against slower decks that run a lot of small units to block with, as Fearsome bypasses most of those. Not the worst, but not the best either.
Pot O' Pain is nice to push damage even when blocked. The more defensive statline can be quite good to stop removal in combination with Catch!, or on Steadfast Elkin to make beefier attackers that can live to attack multiple times. Generally pretty good, but sometimes doesn’t trade well into enemy blockers due to the more defensive stat distribution. For example, if you had an Ionian Hookmaster improvising either Pot O' Pain or Pan O' Pain while the opponent had a 3/3 on board, the 3/1 Tough would be a better option than the 2/3 with Impact, since it trades better.
Upcycled Rake has awful stats and is almost never useful. Only take this one against decks with basically no way to contest the board, because there’s no good way to make use of the Scout keyword otherwise. Scout is only a good keyword if the unit that has it has a way to abuse the multiple attacks. The stock example of this would be a Miss Fortune
 on bench with Valor
 (using Scout and Challenging enemy one-Health units and killing them for free), or big stats attacking multiple times to force awkward blocks. Unfortunately, Jax Vayne is reliant on Equipment to make its units large enough to trade, and Upcycled Rake does the exact opposite of that. There’s no point in Scout-attacking if the unit that’s Scouting gets killed on the Scout attack, since that just leaves your board down a unit.
Do keep in mind that this is not the end-all be-all for Improvised Weaponry – every gamestate is unique and you might pick one weapon over another to account for certain variables. This general tier list is intended mostly as a reference and overview of the various possible weapons, and I highly encourage you to ask yourself, “What weapon makes the most sense here, and why?”
Jax Vayne – Mulligan

There’s not too much to cover here: the mulligan is usually pretty simple. Try to find a good curve, and look for Vayne. Fish Fight can be kept against decks with must-kill threats, such as Gwen , Varus, Zed
 , or decks with bigger units such as Saga Seeker
 in Pantheon lists.
The above would be an ideal opening hand for me: a one-drop into a two-drop into Vayne, with Fish Fight to remove any good blockers my opponent might have.
Some common strong openers are:
- Steadfast Elkin
 on round one, into any unit that Equips on round two,
 - Fireth, Reaper of the Sands attacking on round two or three when you have the attack token, into a Faithful Wolfdog after combat to pick up the weapon Fireth just dropped.
- Just dropping Vayne on round three.
As a rule, combat tricks are not kept. I believe that mulliganing aggressively for a strong opener is the best way to play the deck – we can always find our bigger units later, especially with cycle tools such as Parts Made Whole.
Jax Vayne – Gameplay: Pressure

The main goal of Jax Vayne is to put as much pressure onto your opponent as possible, mostly through the board, but… what exactly is pressure?
I would define pressure as how much your opponent has to worry about at that moment in time. For example, you wouldn’t feel much pressure sitting at sixteen health against Pirate Aggro, but once you’re at six health, you have to start worrying about Decimate s and Noxian Fervor
 s that are going to find their way to your Nexus soon.
Say our foe is playing Seraphine Ezreal Noxus – if we don't put them under pressure, then they are able to make proactive or low-tempo plays such as Fanclub President or Drum Solo
 , but when we put the pressure on them to survive, their options are severely limited because they are forced to find a line that ensures that they don’t die. They are unable to play their high-value, low-tempo cards, because they are spending the mana upfront and it’s very possible that they miss on an answer and then die.
Pressure can also come from open mana or revealed cards in hand, on top of units presenting damage. The opponent must factor your possible plays into their calculations; therefore, the more mana you have available, the more possible cards you can play, which means your opponent has to worry about playing around more things and can’t be greedy, as we discussed above. When you use up your mana to play a unit, you’re converting the pressure from your potential combat tricks to pressure on board in the form of stats. This idea of available mana being dangerous for the opponent leads us to the concept of bluffing.
Bluffing is like gambling. You’re taking a risk for a potential gain or loss; however, just like gambling, you should not put on the table more than you’re prepared to lose. This is the same thought process your opponent should be going through as well, so how can we make the most of this?
The most common way is with Quick Attackers. When we attack with Quick Attackers into bigger units – for example attack with our Jax into the enemy Vayne – they can either choose to block and try to kill Jax, or take some damage to their Nexus. Blocking Jax is very risky, however, since Catch! will grow him to four Power and allow him to kill Vayne for free, which is a horrible trade.
The risk of losing Vayne isn’t often worth the reward of killing a Jax, so oftentimes you may freely attack with Jax into slightly larger units if you have some amount of mana available to threaten combat tricks.
This concept can be applied to any unit that may threaten to kill a unit your opponent is very attached to, once it is buffed with a combat trick. For example, an enemy Varus might not choose to attack when you have four or more mana available, to avoid losing it to a Riposte. You can never play around everything in a game of LoR, but it’s good practice to think about what the opponent might have, and try to rule out cards they probably don’t have, because in X or Y scenario they would’ve used it already.
Let’s look at how Jax Vayne is able to put that pressure on our opponent to respond, and set them on the back foot for the rest of the game.
Jax Vayne – General Gameplan
We Didn't Start the Fire
Usually, we are looking to curve out the first couple of rounds with efficient plays, and then use our superior units and combat tricks to put our board ahead of our opponent’s. We need to do this by taking favorable trades, which means that our opponent will spend more resources on answering our unit than we spent on the unit.
Imagine you started a fire (please don’t do this at home). The fire department will have spent a lot more time and energy putting out the fire than you spent to light it. Just like a fire, units can grow out of control, causing the opponent to frantically run around trying to put them out as they get overwhelmed by the unit spam.
“But wait! Units don’t gain stats automatically! How can they grow?”
Good point, dear reader – our units are not growing in size, but in value. Every time a unit attacks the enemy Nexus, or kills an enemy unit without dying, it increases in value. It’s doing more things the longer it stays on the board. For example, a Swain that lives to strike the enemy Nexus gives you a lot more value for your mana than one that gets instantly Vengeanced. The same concept applies here: if your opponent refuses to take an unfavorable trade, they must sacrifice Nexus health – a limited resource – to hope that a favorable trade for that unit they didn’t sacrifice will appear in the future. We will do our best to ensure that won’t happen.
Usually, we will look for our early units in our mulligan, including some of the strong openers listed under the mulligan section of this guide, and develop a board by round three or four.
Now comes the tricky part: Combat. When should you open-attack versus developing the board? When is it good to trade? Let’s take a look.
Developing
Generally, in this current meta, you will always develop your board by playing units before attacking. Development punishes like The Ruination , Avalanche
 , or Lifesteal units are few and far between, and it’s not a bad thing when your opponent matches your unit with their own. If they don’t, or can’t, then you’ve gained free value for your units.
A noteworthy tidbit is that while developing the board may play into Slow- and Unit-speed development punishes, open attacking plays into Fast- and Burst-speed spells. This is a good concept to keep in mind when playing against control or spell-based decks in general. Usually, you will only open attack if it represents lethal and you have combat tricks in hand to answer interaction, or if it is a favorable attack and you have Joraal to stop spell interaction.
A notable interaction is that Equipping units with Tumble, or playing units such as Faithful Wolfdog that Equip from hand, does not count as “playing” the Equipment, and if the unit is killed, you may Equip the Equipment onto another unit in the same round.
Casting Tumble on a Scout unit, or Equipping a Scout Equipment will Rally. This may allow you to attack with a full board, Tumble a Bloodcursed Harpy, then attack again. When playing Bloodcursed Harpy, it can be a good idea to give it a bad Equipment – especially when blocking – since it will destroy its Equipment to survive the first time it dies. You can then Equip it with a stronger offensive Equipment to pressure on your attack token. A large Scout unit with Quick Attack or Overwhelm is truly a menace.
The best way to play is to prioritize taking favorable trades and forcing your opponent to spend multiple cards to answer a single threat. This means that, often, you’re happy to pass if your attack doesn’t seem too appealing, or you might only attack with a singular, large unit that trades well into every enemy unit; however, if your board is wider than your opponent’s, sacrificing a bad trade to make it awkward for your opponent to block your other attackers can definitely be worth it.
Blocking should only be done when you’re able to trade off an enemy unit favorably, or if trading off an Equipped unit allows you to activate Faithful Wolfdog and put another large threat onto the board.
Jax Vayne – Matchups
Annie Jhin – Unfavored
You must look for a lot of one- and two-drops to survive the early onslaught, and pray that you can close out the game before you get OTK’d by Solari Sunhawk and The Stagehand
 stunning your board. Annie Jhin a very hard matchup, and not one you should expect to win often. Fish Fight is a good answer to Jhin
 , if you live long enough to see him come down.
Seraphine Piles – Generally Favored
Here, we’re looking to pile on the pressure with an early curve and develop into full attacks on every attack token round, seeing as Seraphine decks are awful at contesting the board. Vayne is probably the best card in this matchup, since she can generate Tumble to pressure your opponent even when you don’t have the attack token. Removing Seraphine is not a priority unless she’s leveled or about to level up. If you’d like to make your list better against this deck, Zealous Ranger-Knight and Ranger's Resolve are great options – switch them for some combat tricks.
For the other side of the matchup, here are Card Gamer's Seraphine Ezreal Noxus Deck Guide, and Yangzera's Viktor Seraphine Shadow Isles Deck Guide.
Varus Pantheon and other unit-based decks – about Even
Into unit-based decks, you’re going to be reliant on Bloodcursed Harpy and a leveled Jax to close out the game. Generally you can go a bit wider than these decks, and Vayne is quite nice to threaten attacks constantly. Riposte is very good in these matchups, as it allows you to remove larger blockers or threats permanently, and it’s hard for these decks to respond to. Demacian Tellstones is also very nice to survive a Varus OTK round via Detain, or to remove a Bloodcursed Harpy in the mirror.
Wrapping Up
If you’ve made it this far, I hope that this was informative and that you were able to pick up some new concepts, or think about the game in a deeper way.
Feel free to message me on Discord with any questions at Wekhar#8625, and best of luck to all of you on the ladder!