


Hey all, Sirturmund here bringing you an in-depth dive into Star Spring - TK Raka deck.
For those who are not familiar with me, I am known as one of the few players who still brings Star Spring to tournaments any time I can. I have had a lot of success historically with this deck:
- Top 4 Seasonal in Guardians of the Ancient Season,
- Top 32 Seasonal in Between Worlds Season, and
- Most recently, 1st place finish in MasteringRuneterra’s Qualifier #2 where Star Spring specifically went undefeated.
While the deck might not be the strongest from a ladder perspective, I firmly believe that it will always hold its place as one of the best tournament decks, and this guide is made to convince you of the same!
Deck breakdown
This deck has been more or less solved since its release. There are very few changes that you see between different players’ versions, mostly to the number of some of the spells. The version below is what I think is the best against the current meta decks:
14 cards

26 cards


3x Soraka
Soraka is an automatic three-of. This deck is her archetype, and she's your most important card after Star Spring.
Her level-up ability is very powerful and it is one of the ways you prevent yourself from running low on resources. She is also a very large body, allowing her to serve as a blocker when needed.
Try to play her once she is already leveled-up, or combine her with Boxtopus, to prevent her from dying too early on.
3x Tahm Kench
TK ends up becoming your main way to deal with your opponent's powerful threats and that is why he is run as a three-of here as well.
His An Acquired Taste can single-handedly lock down opponents from developing more units, where sometimes it is better to just hold the card in your hand and not just fire it off right away. Just remember that the opponent’s unit does strike you, so if they can buff it your TK could be in danger!
3x Star Spring
The main win condition of this deck.
The way that you win most of your games will be through triggering Star Spring, and it also serves as the main way to level up your Soraka. This is the main card you are looking for in all of your mulligans -- the earlier you drop it down on the field, the better your odds of winning.
3x Crusty Codger
Now let's go through our units, and start with Mr. Codger!
A staple of this deck because it does everything we need. It comes down already damaged, giving you the ability to heal it and further advance your win con. It is also a 1 drop with 4 max health serving as a great blocker in future turns.
3x Star Shepherd
Some people don’t believe this card is a three-of in this deck, but I sincerely disagree.
Shepherd gives you another one-drop you can target with Croaker, and can serve as an alternate win condition for the deck when you do not draw Star Spring. I have won plenty of games where Star Shepherd becomes huge and can do 10+ damage to the opponent’s Nexus when attacking since you can usually pull blockers away from her using Boxtopus or Shakedown
 .
.
In addition, Star Shepherd becomes an excellent Fearsome blocker, and can trade against almost every other unit our opponent could potentially have.
3x Boxtopus
Another card that is an automatic three-of in every version of this deck.
When paired with your heals -- specifically Soraka or Astral Protection -- Boxtopus becomes a consistent threat to the opponent, able to challenge their cards while damaging themselves in the process. Just be very careful that you do not play Boxtopus unless you have a way to protect it, as there are a lot of one-damage pings running around in the meta currently.
3x Fortune Croaker
Damages itself and one of our units, while also giving us a draw on top of it. What else could we ask for? The damage is supposed to be a downside, but this deck turns that into an upside.
3x Broadbacked Protector
I like to call this card the third champion of the deck just because of how good it is.
Broadbacked Protector is the main reason this deck can survive and stall long enough to get to your win condition. The constant 3 heal per turn flips the matchup vs Aggro decks on its head, and it tends to be very easy to keep him alive through the heals we has.
His 7 health also means that he can be a good blocker into almost anything else in the game, and the best feeling is when you can heal him back up to full with a leveled up Soraka.
2x Shakedown
Now we move on to the spells and we start with a critical part of this deck, Shakedown.
One of the ways people try to counter Star Spring is by not blocking, which is smart as any block just gives us more damage to heal. Shakedown is so good in this deck because it forces the opponent to have to block. You can use this spell on something like your Soraka, drag the opponent’s units and very quickly advance your Star Spring win-con due to all the damage you healed. This card also serves as the best way to remove the opponent’s key units by dragging them and killing them with a buffed-up Star Shepherd.
Or, alternatively, you drag away the blockers so that the Star Shepherd can hit for a sneaky lethal.
3x Guiding Touch
Heals your units or Nexus and draws you a card. Simple, straight to the point, and very darn powerful in this deck!
The versatility that this card provides is one of the biggest reasons for this deck’s strength, as Guiding Touch can give you that heal you need to save your unit while advancing your Star Spring at the same time.
3x Pale Cascade
So this card is interesting because it is technically not healing your or damaging your units, but what it provides is a way to buff your attack so your units become Fearsome blockers or buff your Boxtopus so he can kill some pesky four-health units (talking about you, Veigar).
Oh, and did I mention it can draw you a card too? A theme with this deck is having a lot of draw so that you get your low-cost spells and units quickly before the opponent can push for lethal.
2x Sunblessed Vigor
With the prevalence of low-cost pings (Pokey Stick, Vile Feast, Mystic Shot, etc), I think Sunblessed Vigor is more important than ever in this deck. It counters those pings while giving your unit +2 max health. This means that now your heals will be even more effective on said unit.
The additional two health is important as sometimes the +1 from Pale Cascade is not enough, or sometimes your unit is not damaged for Guiding Touch to save it.
2x Hush
We need to stall with this deck long enough that we can win with Star Spring.
Hush is a tool that helps us deal with some of the strategies that go all-in on one unit, such as Pantheon, Lee Sin, or Elusives. Surviving even just that one turn can be the crucial difference between winning or losing.
3x Astral Protection
Another key card in this deck. It heals your unit for 4 AND gives them an additional +4 max health, effectively an 8 health swing.
Try to keep 4 mana to threaten this heal when possible. Also, if you have Star Spring on the field, try to use this spell when you can get the full 4 heal out of it unless you have no other choice. That additional 4 on the Star Spring win-con can be the difference between winning and being just one short.
1x Bastion
To round out the deck, I run one copy of Bastion.
In a tournament setting, it means that my opponent has to keep in mind that Bastion is a possibility. I think one copy is just right due to pings being so common in the meta. It is very easy for a Shadow Isles deck to have 8 mana and do a Vengeance plus Vile Feast
 to counter the Bastion for example, so I end up finding that more than 1 Bastion is worse for us.
Just rely on having enough heal to save your units, or enough draw to replace them as they get picked up by stuff like Vengeance.
Other Cards:
There are other cards from Targon and Bilgewater that I have experimented with or seen other people experiment with, but none of them ever felt fully right. Reasons below:
- Hired Gun
 - While making some enemy unit Vulnerable is nice, as it allows you to drag it with Star Shepherd or Soraka, I don’t believe it is effective enough or gets us to our win condition faster. Shakedown does the same job but better.
 - While making some enemy unit Vulnerable is nice, as it allows you to drag it with Star Shepherd
- Mountain Goat - I have seen people using Gems as a way to heal and buff your units like Boxtopus, but again I feel it can be a bit too slow and not get us where we want to be. It also becomes a much worse draw the later the game goes IMO.
 - I have seen people using Gems as a way to heal and buff your units like Boxtopus
- Divergent Paths - While it is true that you do want to have your Star Spring early, sacrificing three mana for it is way too costly. If Landmark decks like The Bandle Tree were more prevalent, maybe I would consider running one of these cards, but as it is now it is not worth it.
 - While it is true that you do want to have your Star Spring
- Lounging Lizard - This is not a bad card, as it can push an alternative win con through Elusive damage and it damages itself for you to heal every turn. I, unfortunately, think I just don’t have the right space for it in the deck, other cards are a bit more impactful at what they do to advance Star Spring and stall. This is very close to making the list though, especially in this meta where it can serve as an Elusive blocker vs Ahri Kennen decks.
 - This is not a bad card, as it can push an alternative win con through Elusive damage and it damages itself for you to heal every turn. I, unfortunately, think I just don’t have the right space for it in the deck, other cards are a bit more impactful at what they do to advance Star Spring
- Spring Guardian - Great stats but the Spring Gifts is too slow IMO. You usually don’t have trouble keeping your units healthy, as opponents tend not to block you anyway, so I don’t think there are many spots where you can get full value out of this card.
 - Great stats but the Spring Gifts
 is too slow IMO. You usually don’t have trouble keeping your units healthy, as opponents tend not to block you anyway, so I don’t think there are many spots where you can get full value out of this card.
- Wounded Whiteflame - Has been a consideration, since we can proc his Fated keyword very easily with a lot of our cards. He then becomes really big and bulky, forcing the opponent to block it. However, similar to Lounging Lizard, I have a hard time finding a card in the deck that Whiteflame can easily replace. Maybe taking out one Star Shepherd and adding one Wounded Whiteflame could be a consideration.
 - Has been a consideration, since we can proc his Fated keyword very easily with a lot of our cards. He then becomes really big and bulky, forcing the opponent to block it. However, similar to Lounging Lizard
- Starshaping - Great heal card and can provide you a big alternate unit to finish the game with, but it is very expensive at 5 mana. You rarely want to use something this expensive and potentially tap out of answers, so I lean towards it not being as good as it might seem.
 - Great heal card and can provide you a big alternate unit to finish the game with, but it is very expensive at 5 mana. You rarely want to use something this expensive and potentially tap out of answers, so I lean towards it not being as good as it might seem.
Relevant Gameplay Info
Okay, so we went over the cards, now how do we play the deck and get to our win condition?
Well, at the core of this deck there is a very slow, methodologically, and reactive gameplay pattern. You usually DON’T want to be the aggressor, you want to be the one reacting to what your opponent does, while slowly choking them out and with Star Spring getting you to your win condition.
If we get Star Spring early, then the game becomes immensely easier to navigate. Drop Star Spring as early as turn 2 if possible, even if you are taking some damage in the process, to start healing your units.
A typical turn 1-3 could be:
Crusty Codger >> Star Spring >> Soraka, or another Crusty Codger.
Another version is:
Skip Round 1 >> Star Spring >> Boxtopus (having 2 mana left to use a spell on Boxtopus to save it if needed).
If we don’t have Star Spring, then hopefully we have something like Fortune Croaker to try to draw it, or have Soraka and self-damage units to progress Soraka's level up quickly.
Your turn 4-6 tends to be where you start to stabilize or actively prevent the opponent’s game plan. You are playing your Broadbacked Protector or Tahm Kench during these turns while always keeping enough mana to protect them if needed, depending on the opponent’s deck. You could also go a more aggro style with Star Shepherd getting big around this time, or having a sticky Boxtopus on the field. If everything is going okay, Soraka should be leveled or very close to leveled by this point.
After this, as we shift to the late game, it becomes a battle of attrition and always keeping the mana and spells necessary to keep your units alive. These turns are when things like Shakedown become critical to damage your units and when you are looking for things like Hush to slow down your opponent just enough. Very likely you can win if the opponent gets careless and attacks your units.
All in all, the most important aspect through all turns when playing TK Raka is to never tap out of a response to your opponent’s possible action. This requires extensive knowledge of your opponent’s deck and what cards they might have, and understanding what they need to do to win. Your win condition is inevitable, it’s just a matter of getting there before they do!
Tips, Tricks, and Weird Interactions
When to use Tahm’s spell and when not to is one of the most important things with this deck.
The threat of you having An Acquired Taste available is usually enough for opponents to not develop units like Lee Sin, Miss Fortune, or Veigar into you. Therefore, sometimes the best thing you can do is not even play it.
Just hold it in your hand until they don't have enough mana to summon those units. It’s okay, they usually need those units to win, while you can still win with Star Spring even if they are burning their mana and delaying their win-con every turn.
It is also important to remember that the unit Tahm Kench targets will be striking your champion, so think of what buffs or damage spells the opponent might have and if they are enough to threaten your TK. Ideally you want to have at least 4 mana whenever you have An Acquired Taste in hand, 2 to use it and 2 for something like Guiding Touch, Pale Cascade or Sunblessed Vigor.
The double Star Spring interaction.
The way that Star Spring works is that you win the game if at the end of the turn the Star Spring reaches 22 or more healed damage.
However, each Star Spring only checks for this win condition once at the end of the turn, and they trigger from left to right. This can come into effect in certain games where you think you might have the win at the end of the turn but not truly have it just yet.
So let’s say you have two Star Springs on the board. The first one to the left is at 20/22 and the second one is at 10/22. You also have a fresh Crusty Codger on the field. So, at the end of the turn, the Crusty Codger will be healed from both Star Springs from 2|2 to 2|4 and get your first Star Spring to 22/22 and win you the game.
Right?
Nope, wrong.
The way that it works is that the first Star Spring triggers, healing your Crusty Codger to 2|3. Once it finishes healing it, it will do its game-winning check. Because it only healed the Crusty Codger once, the Spring's counter is only at 21/22 when it does its game-winning check.
After this check, the second Star Spring now triggers, healing the Crusty Codger to 2|4 and taking the first Star Spring to 22/22. However, because the first Star Spring already did its game-winning check, it will NOT do a second check this turn, thus the game continues to the next round.
This is very important to understand because that one turn difference could be all your opponent needs to win the game!
I have mentioned this a bit above on the card breakdown, but one of the most surprising ways I win games is through aggroing down the opponent. They never expect the Soraka TK deck to become aggro and get their Nexus HP to 0, but it CAN happen and the most common way for it to happen is through this two-card combination.
It is very easy to get Star Shepherd to astronomical power, like 10+ or more. The problem is she doesn’t have Overwhelm or Elusive, so her power ends up being wasted more often than not. A way to get around this is by removing your opponent’s blockers entirely, and this is where Shakedown comes clutch. If an opponent has two blockers and you have 3 units including the Star Shepherd, grab the blockers with your other two units (if they can survive the dmg) and push that damage!
Another way these two cards come clutch together is by allowing you to grab an opposing key unit and kill it with the huge power from Star Shepherd. Killing Trundle or Swain is actually quite easy for Star Shepherd!
Nothing is worse than eating one or two of the opponent’s key units with An Acquired Taste, and then have your Tahm Kench removed from the field, thus bringing those units back for your opponent.
If you find yourself in that position, with no way to protect your Tahm Kench from removal, Hush can be your savior. If you Hush your own Tahm Kench when he is being removed, the units he ate will be gone forever. They do not come back to the field. This is definitely worth using a Hush for, if it means preventing your opponent from getting something like Lee Sin or Veigar back to their field.


While we do not run Wish on our main deck, having Soraka provide it through her Champion spell can be the way for you to win many games.
Don’t be greedy holding this back if you have a full board of damaged units that you can heal. It is more often than not better to use Wish than replaying a second Soraka. Of course, be mindful of things like Nopeify! or Deny
 .
.
Similarly, Tahm Kench's Champion spell Bayou Brunch can be very useful and clutch in certain situations. The best time to use this is when you can level Tahm Kench from it or can follow it up with An Acquired Taste to level him up. When Tahm Kench levels up, allies that you have eaten return back to your board so sometimes a neat play is eating your own Soraka or Broadbacked Protector to give Tahm Kench an additional 7 health, then eating an opponent’s unit to level up your Tahm Kench, and having your unit return to the field.
The unit returns fully healed, so sometimes you can eat a Broadbacked Protector that is about to die and return it to the field with full health!
So there are two interactions here with Hush that are worth discussing.
The first I think is very common knowledge and very useful when facing Noxus decks. If your unit has more health than its original health, let’s say due to Sunblessed Vigor, and it is damaged, you can Hush it so that it goes back to its original health and be undamaged. Again, this is useful against cards like Scorched Earth or Flock, as now both spells are canceled unless the opponent commits another damage spell on you.
The second interaction is more low key and not many people know of it, Hush can heal your units!
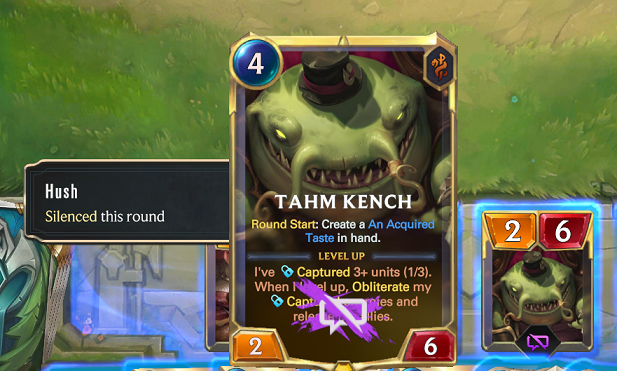
Let me explain. Let’s say you have a unit that you have used Astral Protection or Sunblessed Vigor on. In this example let us say Tahm Kench with Astral Protection:
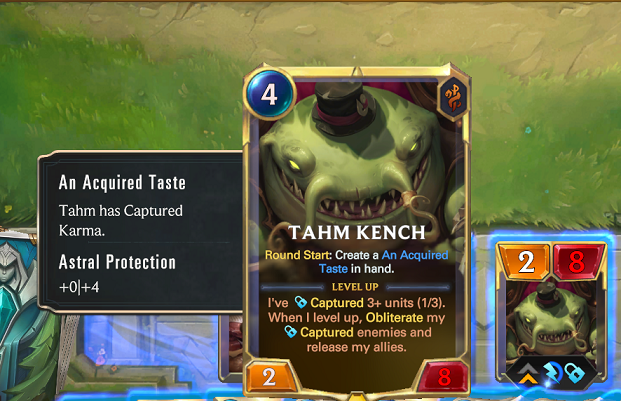
Now as you can see in the image, TK currently has 10 total max health due to Astral Protection and he is currently damaged to 8 health. Now, what would happen if I use Hush on my own Tahm Kench?
As you would expect, Hush removes the Astral Protection effect from Tahm Kench. So now Tahm Kench is only 6 HP. Remember that this Tahm Kench was damaged before the Hush though, so what do you expect to happen when the Hush runs out at the end of the turn? You would expect him to go back to 2 | 8 like he originally was before the Hush right? Well, look at what happens below:
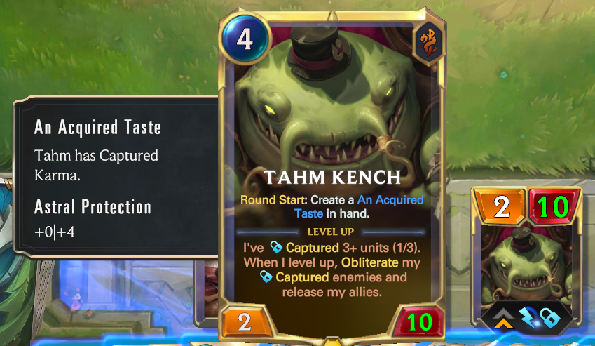
When the Hush runs out at the end of the turn, Tahm Kench returns to 2 | 10 full health instead of the 2 | 8 that he originally was! Effectively healing him two health in the process of the Hush.
My guess as to why this happens is due to the Astral Protection effect of +4 max health retriggering again. It doesn’t increase the max again, but it does heal +4. And you can even see it when the round ends and hush runs out, the +4 triggering again.
This trick also works with Sunblessed Vigor and does NOT require the card’s health to be above their original max health, just requires the card to be damaged when you Hush it. See the example with Crusty Codger and Sunblessed Vigor below:
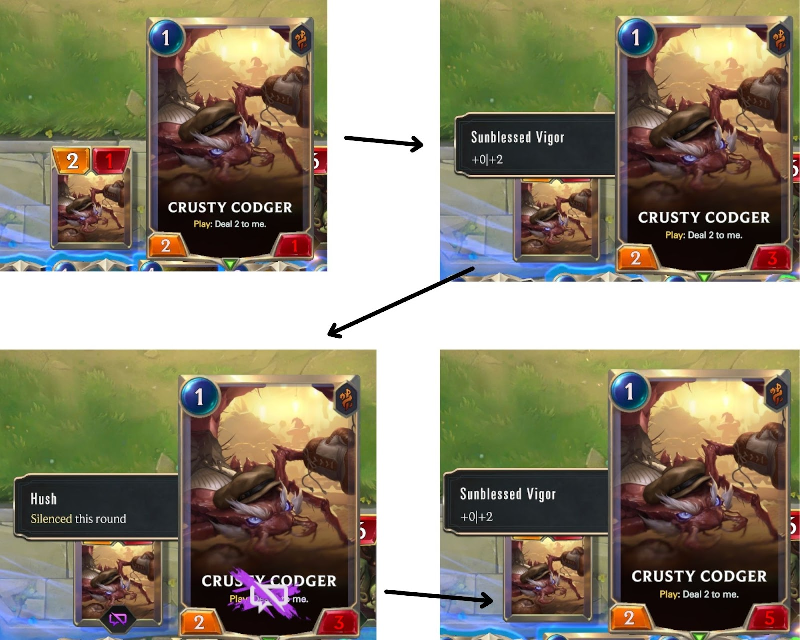
In this example, we used Sunblessed Vigor on a 2 | 1 Crusty Codger, taking it to 2 | 3. Then used Hush on it, and when the Hush ran out, the Crusty Codger became a 2 | 5, healing an additional 2 health.
This interaction can come clutch in certain matchups, so it is very good to know!
Lastly, I wanted to briefly touch more on Broadbacked Protector.
As I have mentioned, he is very crucial to the deck and its stalling purposes. So please understand that at the start of every round, he will heal 3 to your Nexus and damage himself for 3 if you have 17 or less Nexus health. So if you have him on the field, make sure he has 4 or more health at the end of the round so that he does not die to his own skill!
Note that if your Nexus only has 18 or 19 health, he will only heal 2 or 1 and damage itself the same amount. So the 3 damage is not fixed damage. Similarly, if you are full health, he just won’t heal at all.
If you have Star Spring on the field, you can let your Broadbacked Protector stay at 3 HP since at the end of the turn Star Spring will heal it to 4 and then he will hit himself for 3.
Basic Mulligan Guide
In terms of a mulligan, it tends to be pretty simple here: You want to have Star Spring.
If you do not have Star Spring in your opening hand, it is worth it to mulligan everything away except for maybe one Crusty Codger if you think you need to block early, one Tahm Kench if you are up against Lee Sin or Darkness, or one Broadbacked Protector if up against aggro.
Keeping Soraka tends to almost always be right as well, as she can not only heal your units but serve as a powerful blocker.
Boxtopus is the last one that is a consideration, I usually keep it only if I have a Guiding Touch or Sunblessed Vigor to back him up when I play him.
Matchup Specific Tips
So let’s get to the match-up-specific advice. The conventional wisdom is that TK Raka has a lot of polarizing matchups, and while that is still very true, playing this deck optimally can increase your chances of winning in these matchups.
In general, our deck tends to do well against what I could call traditional aggro decks: Spider aggro, Pirates, etc. They cannot deal with your Broadbacked Protector if he is on the field. The deck also tends to do well vs Control decks, specially Freljord versions that run a lot of AoE, as their Avalanche and [Blighted Ravine]] help you towards your win condition.
The deck tends to struggle vs midrange decks that have removal with them, such as Pantheon Shyvanna decks with Single Combat and Concerted Strike
 .
.
The deck can also falter against certain Fearsome or Elusive matchups, as there are only so many attack buffs and Hushes that you have.
Lastly of course is losing to Noxus decks that run Scorched Earth , as unlike The Bandle Tree
 , you cannot just replay a second Star Spring, you have to start over from 0.
vs Darkness Control (Even)
Our matchup against the most popular control deck in the current meta is not as favorable as it once was.
Traditionally, TK Raka does well vs control, but the problem with Darkness Control is that their removal can get big enough to kill your units through their big health and you have to deal with their champions ASAP.
Unfortunately, the only ways to deal with Veigar are TK, or challenging him with buffed-up Boxtopus or Star Shepherd.
The biggest tip for this match is to keep either Crusty Codger or Fortune Croaker in your opening hand, as you want to trade into the Catalyzer if they play it in turn 2. The worst thing you can do is let Catalyzer get more than 1 hit in. After that, it's a matter of attrition and hopefully having Star Spring on the board to put them on a timer. Hush can be key to silencing a leveled Veigar if you need to buy one turn to win the game.
vs Scouts (Favored)
This might seem like a weird take, but I think TK Raka is favored into Scouts, regardless of what the stats currently say.
Your big health units like Soraka, Tahm Kench, and Broadbacked Protector present excellent blockers they cannot get through. They usually also have no way to kill Tahm Kench if you have the right tools to protect him.
Boxtopus becomes a key card in this match-up, especially if you can play Astral Protection on it. Drop Broadbacked Protector and you can negate most of the damage they deal early. In the end, Star Spring can quickly get to 22/22 because they have no choice but to attack often.
vs Lurk (Unfavored)
Unfortunately, Lurk units get too big too quickly and your only way to deal with them is to block them, which you usually hate doing with this deck.
Trading your units one-for-one benefits them more than you, and in the end, you don’t have great ways to deal with Rek'Sai or Pyke
 . Star Spring, even if drawn early, ends up being too slow against this deck.
vs Ahri Kennen Recalls - Any Version (Slightly Unfavored)
This is a weird match-up because of Homecoming . Any time you are close to winning with Star Spring, they can recall your landmark to force you to restart from scratch again.
My advice for this match-up is twofold. First, try to see if you can get TWO Star Springs down in the field. If you get two of them going at once, it is very hard for them to stop both when you are close to winning.
Second piece of advice is Broadbacked Protector, it allows you to heal off all the Elusive chip damage that the deck does to you. You can stall a long time with one or two Broadbacks, until you get your win condition going.
While it sounds dreadful, the match can be winnable if you get to either of the above two scenarios. When challenging units with Boxtopus, don’t bother going for their Droplet. Just try to target their Ahri, Mourned, or other units that they do not get a lot of value from recalling.
vs Teemo Caitlyn (Slightly Unfavored)
You have a lot of draw, which means it is very likely for you to draw a lot of mushrooms.
At the same time, their flashbombs become a lot worse than in other matchups as they are damaging your units and allowing you to heal up more. Try to play Tahm Kench, Boxtopus or Hush to deal with Teemo and reduce the total number of shrooms in your deck, and stall with the rest of your units as needed.
vs Spider Aggro (Favored)
While they do have a lot of Fearsome units, they cannot handle Broadbacked Protector.
In this matchup I will hard mulligan for it, even sending back Star Spring depending on the rest of my hand. Because these types of traditional aggro decks do run out of resources quickly, if you can stabilize with a Broadbacked Protector and heal 6 between each of their attack turns, they can never find enough burn damage to get through to you.
vs Viego Kindred (Unfavorable)
This matchup is probably one of the worst matchups for this deck, as they have Fearsome to get through your blockers, and Kindred marks to slowly kill your units.
You can try and eat some of their champions with Tahm Kench, but have to be aware of Twin Disciplines buffing them to kill your Tahm Kench.
You basically hope to try and high roll an early Star Spring into a quick victory, before they manage to level-up their Viego.
vs Pantheon - Shyvana or Taric (Slightly Unfavored)
Their big beefy units tend to not be THAT big of a deal, as you can buff your units past their attack. The problem in this match-up is Concerted Strike, it can single-handedly ruin your day as it could kill most of your units through any buffs you might have.
Your attacks with Soraka also become a lot worse once their dragons grow to 5+ Attack, limiting the number of heals you can do in the game.
However, I still think this is a very winnable match up because these decks are unable to go super wide, they tend to just have one or two big units at a time, allowing us sneaky plays with Shakedown or Boxtopus to pull the big units away from your more key units.
vs Zilean Xerath (Unfavored)
Unfortunately, these decks run Desert Naturalist , so they have a way to deal with your Star Spring when you are close to winning.
Your best hope is to draw double Star Springs and set them down early to level together. Be careful of their big combo turns where they summon the 5 | 3 Fearsome attacker, it is usually the big thing that can get through your blockers. The plus side in this match-up is that Xerath's skill, and Zilean's Time Bomb s both become worse for them as they damage your units and help you heal faster.
Unfortunately, you have to find a way to win before turn 8 or 9, as Arsenal is almost impossible to deal with unless you have Hush.
vs Feel the Rush (Favored)
This matchup is one of the reasons you bring a deck like TK Raka to the tournament lineup, where you can target super slow control decks with lot of AoE, such as FTR.
This deck has no way to deal with Star Spring and many of their draws end up being dead draws. You have Hush to stop their big Overwhelm turns, or simply buff your units enough with Astral Protection to be good blockers vs their big units.
The only thing you have to play around in this match-up is The Ruination , as clearing your whole board tends to mean game over for you. It is very hard to build it back up.
vs GP Sejuani (Favored)
Another match-up where Tk Raka is favored. Whenever GP Sejuani becomes meta, I become a happy man.
They have no way to deal with Star Spring and they usually want to keep attacking or doing their pings on you, all of which you can heal up as needed. Tahm Kench becomes a machine at eating their champions, with the main priority being Gangplank . Leveled-up Sejuani does almost nothing for them in this match, so don’t worry too much about her.
vs Turbo Thralls (Favored)
A lot of their cards, like Avalanche, Ravines, and Ice Shard, become dead draws for them in this match-up. Drop your Star Spring down early and slowly start winning the game from there. When they are running to summon their big thralls, you have some units like Soraka and Broadbacked Protector that can defend most of the damage through their high health. One of the best plays is to use Sunblessed Vigor on a leveled up Soraka so she now has 9 health to block the Thralls with. If you ever block a thrall that way and Soraka survives, you almost always win the next turn by an open attack with Soraka and getting all that heal value from her.
vs Fizz Lulu (Slightly Favored)
Name of the game will be Broadbacked Protector. If you get him down on the field early you can heal off any chip damage and start stabilizing.
The only thing you have to be careful of is their Yordles in Arms  turn, and if they have 3+ Elusives to go with it, as you have a hard time blocking the Elusives.
You can deal with Lulu in different ways, through Boxtopus or Tahm Kench. And you can block the rest of their units through your units, making it difficult for them to ever get too much damage through you. Again just make sure you are saving your mana to counter a Mystic Shot or Get Excited!
 trying to target your units.
vs Anivia (Favored)
Similar to Feel The Rush match up, this deck's AoE damage helps you more than it hurts you.
On top of that, Anivia herself also helps you at times. You can also eat her with Tahm Kench which doesn’t count as killing her, allowing you to delay their game plan a bit.
They have no way to stop your Star Spring from eventually winning you the game, just be very careful to not overdevelop and fall prey to a big Ruination.
vs Lee Sin Zoe (Favored)
The marquee tournament match -- Tk Raka vs Lee Sin!
You can win through either Star Spring or aggroing them down with Star Shepherd in this match-up, assuming they do not get more than 1 Eye of the Dragon on the field.
You want to keep Tahm Kench in your hand in the mulligan as he is the way you interact and deal with their Zoe or Lee Sin. If they have 5 unit mana and you have An Acquired Taste in your hand, do not play it. Wait for them to tap out of mana for Lee.
They have added Whiteflame recently to their deck, so be careful of Whiteflame + Sonic Wave combo to pick off your units. And lastly, Hush will be very clutch to stop their big Overwhelm finishing move and buy you just enough time to potentially win the game next turn.
Closing words
Okay, all the writing is done! Phew, this was a guide and a half. I love this deck if you can’t tell, so I want this deck guide to serve as the ultimate reference for anyone ever wanting to pick up a Star Spring - TK Raka deck.
I know some of you also prefer to watch the deck's gameplay, so I tried to list some YouTube videos from myself and the MaRu team. See below:
Sirturmund’s Deck Breakdown for TK Raka (Jan 15th, 2022 upload): https://youtu.be/YLi90WU8Ryg
Sirturmund’s Tournament Gameplay featuring Tk Raka (Jan 14th, 2022 upload): https://youtu.be/pL6YnJYIb4Y
MajiinBae’s Deck Guide (Oct 8th, 2021 upload): https://www.youtube.com/watch?v=30j2xW6qeNM
Another MajiinBae deck Guide (August 6th, 2021 upload): https://www.youtube.com/watch?v=Bwj3dyuvD4Y
An older guide from Jasensational but many things still apply (May 8th, 2021 upload): https://youtu.be/yQKsF22m0SA
Thank you all for reading, and please let me know if you have any questions or any suggestions. If you liked this guide, expect more like it in the future from me on this site. If you want to know where to find more of my content:
- Weekly Best Of 3 Line Up Recommendations, from Monte and myself (link),
- My youtube channel where I post daily LoR videos: https://www.youtube.com/channel/UCf6lfIa0XLUJGp4VGxuh49A
- My twitch channel where I stream 3-4 times a week: https://www.twitch.tv/sirturmund
- My Twitter where I post whatever 🙂 https://twitter.com/SirturmundLOR
Thank you again and hope to see you all again next time!