Sejuani Gwen – What the Sharks Say
"This deck lets you get BIG numbers out of nowhere! Decks outside of Ionia really have a hard time dealing with the constant pressure of your thick units!" - Bandit Keith, 7-time Seasonal Playoffs Qualifier
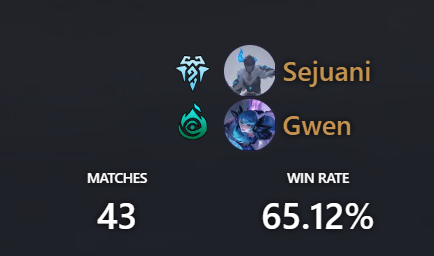
Best LoR Decks: Sejuani Gwen – Overview
Hello everyone! SharkBait here, your friendly neighborhood Longtooth, back at it again with another deck guide. We’ll be talking about one of the best LoR decks right now, that’s been having success under a lot of people’s noses (as Leer showed in his Monday Meta Decks Report, it went from zero to hero almost overnight), and that can pack one hell of a punch to an opponent's Nexus: Gwen Sejuani
 .
.

23 cards

17 cards


For this deck guide, I sat down with Sora for a couple of coaching sessions to have a better grasp on playing the Gwen Sejuani archetype. This is a beatdown deck. In a nutshell, this particular list revolves around playing for curve and hitting the opponent’s Nexus as often as you can, as hard as you can. Occasionally, you’ll end games with Atrocity or the few burn tools that you have in your arsenal.
While trying to learn the deck from Sora, I noticed that a lot of his success comes from the decisions you make during the Mulligan phase. We want to deal the most damage possible out of a decent curve, and we can accomplish a solid curve by having a solid starting hand. Because of this, we will be discussing the individual cards and occasionally discuss when and when not to keep them during mulligan.
The Guests of The Midnight Revel

These Hallowed units, when killed, will provide the attack buffs to your next swings, and will often serve as blockers when you’re trying to make good trades for board control. Let’s meet the guests of the Midnight Revel!


Cordially inviting you to the Midnight Revel is none other than our Boisterous Host. He is often a good keep in our opening hand, as he fits well towards a good curve. And Phantom Butler is here to serve us some value. He’s a decent blocker, while sometimes being a Fearsome unit that’s difficult to block. During mulligan, we usually want to keep him when we think that the opponent has very few early Fearsome blockers, or if they do not have good ways in removing him.
Against aggressive matchups, Gwen is always a keep. When left unanswered, Gwen can stall out the game and give us some sense of board stability, while slowly draining the opponent’s Nexus with Snip Snip! . We never want to keep two copies of Gwen in our mulligan, though – according to Sora, you want to have other cards for a better curve. This is not to say that double-drawing Gwen is bad: an extra copy that we can play if our first Gwen goes down is often helpful. In addition Gwen's Thread the Needle
 can sometimes be clutch. We can use it to remove big threats or occasionally kill an Overwhelm blocker to get extra reach for lethal.
Sejuani’s Clan
Now that we have discussed our Hallowed companions, let’s talk about where we can put those Hallowed stacks to good use. In this particular archetype, when going for a wide-board swing, SEQUENCING MATTERS. Being able to choose the correct unit to give the Hallowed buffs to is an important skill to have. For instance, if our opponent has Braum on board and we’re trying to push for damage, it’s better to put Phantom Butler first in the sequence because of its Fearsome keyword. Think of your first attacker as a left-hook punch – they will always be at the left-most part of your attacking board. With that said, an Overwhelm unit with enough Hallowed stacks (and maybe Equipment too) can strike like a body blow from Mike Tyson. The cards below are units that care less about chump-blockers and more about punching our opponent in the face.

First off on our list is a reliable two-drop, Ruthless Raider, a really good early-game unit to deal some chip damage.

We have quite a few two-drops in our deck. Since we are playing for a good curve, some mulligans may be tricky. If we are attacking on odds (we have the attack token on the first round), Tusk Speaker is almost always a keep. We often want to play Tusk Speaker on rounds when the opponent has the attack token. Although we aren’t a full-on plunder deck, trying to deal damage to the opponent’s Nexus every round can certainly give us an advantage, given that we have three copies of Sejuani.

Now, this is an interesting one. When do we keep Ancient Yeti in our mulligans? According to Sora, Yeti is often a keep when facing slower decks, as it can threaten significant Nexus damage while trying to force your opponent to have an answer. Yeti is also a really good card to have in hand against Demacia decks, like Poppy Taric
Taric – archetypes whose win condition revolves around controlling the board – as they will have some trouble blocking him without sacrificing board advantage. Ancient Yeti, when held in hand during the early game, can come down in the mid-late game as a potential game-ending threat. Much like what Bandit Keith said at the start of this article, units like Ancient Yeti can come down and get BIG numbers out of nowhere.
When a good curve presents itself during mulligan, Sejuani is a good keep in certain matchups, especially if you are playing on evens. We usually want Sejuani to come down on our attack turn. Her Glacial Prison (A.K.A. Frostbite plus Vulnerable summon effect) is a very powerful tool all by itself. We want to use this on their backline units that prevent our win condition (like Eye of the Dragon or Kindred
 ) or to threaten more damage with Overwhelm.
Furthermore, Sejuani (level 2) is also extremely powerful when combined with Nexus pings like Gwen’s Snip Snip!, Unspeakable Horror
 , or Ram Stance
 : Frostbiting the opponent's board can completely waste their attack token. Sejuani (level 2)’s passive can also give them awkward blocks for our own attacks. This is the reason why we usually want to play Tusk Speaker on our defensive rounds, to further progress the Sejuani flip.
Equipment and Stances

Ah yes! More decisions! In this portion, we will talk about the pool of Improvised Equipment and Stance Swaps. Being familiar with how to efficiently use these tools will definitely take your Nexus-punching skills to the next level, as there are a handful of unique lines to consider whenever we are choosing which Stance or Equipment to use/manifest. Let’s discuss the cards that create these tools and some of the lines that they can offer.

Our deck does not run any draw tools. Therefore, a unit that gives us recyclable Equipment can be handy. Because of this, Fireth, Reaper of the Sands is an understandable addition to the deck. She helps our curve, and her manifest options are somewhat flexible and help us plan our turns. And she's a one-drop, which is good against matchups that we are trying to race down.
But having Equipment alone isn't enough to get us consistent victories. We must also think about what Equipment can get us more value, or in most cases, more damage to the opponent’s Nexus. A lot of plays are very unique so you may not always know right away which Equipment to go for, but here are a few things to consider when choosing a specific Equipment:
Combat Reel is a tool for when you have a spell-heavy hand. There are some board states in which this is the best option, especially if you’re going for extra damage but do not have enough mana for burn, like Atrocity.
Sandworn Amulet can put a lot of pressure in the early stages of the game. Between rounds two to three, a lot of matchups will have trouble answering your Fearsome blockers.
Shepherd's Authority . If you have the attack token at the beginning of the game, this Equipment on Fireth is a potential four damage to the Nexus, a one-mana Decimate
 if you will. In addition, this is the Equipment in the Improvise pool with the most attack-stat buff, which is extremely threatening with all the Overwhelm units in our platoon.
The Fix-Em 5000 is one of our least-picked Equipment. We only ever choose this if we do not want to trade certain units when we attack, making the opponent’s blocks awkward with the Quick Attack keyword.
Pan O' Pain is what we want to go for when we have a big unit, and sometimes maybe a Stance Swap
 to get Regeneration. This combination is especially useful against decks that try to play for the board. In those types of matches, it can be extremely difficult for them to remove a Gwen with Regeneration and Tough. Plus, Pan O' Pain is highly recommended in matchups with one-damage pings. For instance, a lot of Bandle City decks run three copies of Pokey Stick
 .
.
Pot O' Pain . The flavors in this pot are so good that it indeed hurts. This might be the best defensive tool in the pool – in most cases, it’s a better Health buff for Ruthless Raider than Pan O' Pain. Along with the +1/+2 buff, the Impact keyword that it provides gives synergy towards Sejuani. For instance, if the Sejuani on board is one Nexus damage away from leveling up, a Nexus strike from your Pot O' Pain unit will not only level her up but also Frostbite your foe's entire board with the extra one-damage trigger from the Impact keyword.
Upcycled Rake is the spiciest option in the pool. This is the ‘high risk, high reward’ equipment. There are only a handful of units in our deck to whom we want to give this, like Gwen or Sejuani. The reason why this is high risk is that the opponent can punish us when they remove those units. Gwen with Scout is extremely powerful, but a simple Riptide Sermon
 from the opponent will give them a massive tempo advantage.
And finally, we have Fishawhack . In the couple of games that we played during my coaching session with Sora, Fishawhack is the Improvised Equipment that we chose the least. It’s a little bit funny considering that I mentioned ‘Nexus damage’ quite a few times already, but our deck is already running eleven Overwhelm units, not to mention that you can also get Overwhelm with Stance Swap, making Fishawhack one of the least viable options. But hey, if you think the correct play is to give Phantom Butler or Gwen Overwhelm, then go for it.


Now, this one is easier to figure out. The beautiful thing about Stance Swap is its flexibility. When the card gets created in our hand, we are not locked into a specific buff. This makes running cards like Vulpine Wanderer and Inner Beast worth it. Let’s talk about the Stance Swaps!
Ram Stance. Oh hi, Sejuani (level 2)! During our sessions, this is the Stance that Sora and I use the most often. This is partly because we were running into a lot of ‘go-wide’ decks on the ladder, but it’s just simply a good option to have. It is a threat that can also help Sejuani level up. Without even using the card, just having it in your hand will make the opponent think twice before developing. Alternatively, it can also be a proactive play if we are trying to remove blockers like Dragonling s from the opponent's board to set up our attack. Keep in mind, though, that you will not be able to play Ram Stance if you do not have any allies to target with it. However, it does not fizzle if the targeted ally gets removed.
Boar Stance . As mentioned, this is a good Stance to pair with Pan O' Pain, especially in matchups that lack hard removal. We can also buy time and stall out the game long enough to outvalue our opponent and find lethal. A Tough 5|6 Gwen with Regeneration can be a nightmare to deal with.
Wildclaw Stance . Oh hello, Scout Gwen! Talk about your all-in, huh? Gwen is arguably the best target for this. It is a potential game-winning play if your opponent has no answers to your Big Bad Overwhelm Gwen. The extra +2 Power from Wildclaw Stance also gives us an additional one-Health Drain from Snip Snip!, if Gwen is already flipped.
And lastly, Bear Stance . This option is good for when we are trying to push for more damage while trying to keep our units out of removal range. It can also be a defensive tool, buffing up our unit to allow them to block without dying, and still giving reach for a potentially lethal swing on our attack round.
Removal and Reactive Tools
Although we are kind of an aggressive deck, our list does have some reactive tools to help keep our units safe or at least give us valuable trades. After careful consideration, these are the other cards that Sora and I ended up running.

For one mana, we can answer the opponent’s removals by dealing two damage to one of their units, while trying to roll for a Husk with a good keyword.


We felt like one copy of Three Sisters is enough. This is a very flexible card that can come clutch in certain board states.
Flash Freeze allows us to make favorable trades or buy time when the opponent is trying to finish us off. Yes, we’re looking at you Lee Sin (level 2) .
.
Fury of the North helps protect our valuable units while giving us extra damage for extra reach.
Entomb is the one we use the least. This card is often the choice when we need to remove a unit to set up for our "all or nothing" play. Occasionally, we can also use it as removal, to allow our Overwhelm unit to hit face.
This is one of the few ways for us to kill the opponent’s units and help maintain board control. Alternatively, we can also target the opponent’s Nexus to play towards Sejuani's level-up. The created card that we get can also fit well into our game plan. Some good pulls that come to mind are Pale Cascade , Lunari Shadestalker
 and Doombeast
 .
.

Arguably an S-tier card in Shadow Isles. Another good removal. I rarely leave home without a few copies of Vile Feast in my SI midrange deck.

We added one copy of Vengeance to remove large threats from the opponent’s board. This buys us time to set up our board for our game-winning plays.
Say it with me now, FACE… IS… THE… PLACE…
It is not uncommon for Shadow Isles decks that can go big to have a couple of Atrocity copies. This card will serve as our finisher, usually when the opponent's Healt is low enough and taps out of mana for any answers.
Mulligan (And Other Tips)
As mentioned at the beginning of this guide, our main win condition is to hit the opponent's Nexus as hard as we can, as often as we can. To do that, we need the right cards. Our advice to players who are new to this archetype is to always check where the position of the attack token is at the beginning of the game.
Look at the bottom right of the screen. Is there an attack token? If so, then Tusk Speaker is a relatively good keep, since we can use it to ping the Nexus on round two (in which we won't be attacking). Sejuani, however, is not the best keep when we are attacking on odds, because we usually want to summon her on rounds when we have the attack token (round six).
On the other hand, even though we are trying to ping the Nexus on our defensive turns, it is not recommended to always use all our resources towards progressing Sejuani's flip. Proactively pinging the Nexus with Unspeakable Horror is not always the play.
Another tip would be to try and make your opponent's blocks and attacks as awkward as possible. As we said, we have a lot of two-drops.
Deciding on which unit to play is also something to think about. Take, for instance, Pirates – AKA Miss Fortune Twisted Fate
 . If it's round three and the opponent plays Miss Fortune, Ruthless Raider might be a better play than Phantom Butler or Vulpine Wanderer, as Ruthless Raider cannot die to Miss Fortune’s Love Tap
 .
.
And one final tip, when a good curve presents itself during our mulligan, Gwen is always a keep.
Matchups

Kindred Nasus (Favored)
Do not throw away Hate Spike on your mulligan. Similar to the other matchups, we will be looking for our one- and two-drops for our starting hand. We need to flip Sejuani as soon as possible. As per Sora, Inner Beast is often a keep to prevent the opponent from killing our units with Vile Feast or Hate Spike. Vengeance is also a keep to answer Kindred or Nasus . Atrocity is optional.
One thing to remember about Kindred Nasus is that they usually do not have burn outside of Atrocity. Because of this, we can use our Health as a resource and race them down before they can pull off their Nasus – Atrocity finisher. Try to keep mana up for Flash Freeze from Three Sisters or Vengeance to answer this.
Red Gwen - AKA Gwen Katarina (Favored)
This is an interesting one. We want to look for Gwen and Sejuani on our mulligan. We know that our foe is also using an Overwhelm deck with a similar strategy. Sejuani (level 2) will help us survive this by Frostbiting their units, while alternatively giving us opportunities to remove annoying threats such as Eternal Dancers , Katarina
 , or their Gwen. Gwen is a keeper here, since we know that the opponent is the faster deck and their board will likely go wider than ours. We need her for Drain to sustain our Health while helping progress Sejuani’s level up in the process with Snip Snip!. Leveling up Sejuani will give us a big advantage. Some of our focus will be more on her. With Sejuani (level 2) on the board, our Nexus pings will heavily punish a lot of their plays, especially The Harrowing
 .
.
Vulpine Wanderer and Inner Beast are also considerations to keep during mulligan. Boar Stance on our big unit is what we usually want to go for. Giving Regeneration to our damaged unit on our defensive rounds will deny the opponent answers like Scorched Earth or Ravenous Flock
 when they swing afterward. In addition, Ram Stance is not bad as well. As I said, the opponent has a lot of tools to go wide. Ram Stance is a good punishment for this, while also helping towards leveling up Sejuani.
And another tip from Sora is to avoid going for full-board swings on scenarios when the opponent will have enough mana for The Harrowing next round. This will minimize the revived units on their side of the board.
Pirates – AKA Miss Fortune Twisted Fate (Even)
For this matchup, we need to find our one- and two-drops during our mulligan. A good keep is Vulpine Wanderer to potentially clear the opponent's board with Ram Stance, and Ruthless Raider because she doesn't die to the opponent's one-damage pings (Love Tap, Make it Rain , TF's Red Card
 ).
).
Speaking of pings, according to Sora we shouldn’t keep too many of our Hallowed followers. We can get heavily punished if we full-develop them.
Gwen, on the other hand, is always a keep against Pirates. Snip Snip! is additional Nexus damage and Drain to race down the opponent. Vile Feast is also a keep for stalling. If the opponent has six mana up but goes for another play instead of Riptide Sermon on our Gwen, that is an indication that they might lack removal for her and we can potentially go for a double swing with Upcycled Rake if we can Improvise it. Otherwise, we need to protect her, often by giving her Boar Stance or Pan O' Pain.
Machine Gun Kenny – AKA Ezreal Kennen (Unfavored)
 Kennen
In this matchup, off the bat, we will be looking for our early-game units – we are going to go ham this time. Keeping removal spells like Vile Feast, Unspeakable Horror, or Hate Spike is optional to deny Kennen his recall. Phantom Butler is a nice round-two play for us, since they rarely have any Fearsome blockers. Ram Stance is also something to threaten their board with, possibly killing Kennen or maybe their Dragonlings to give us a better attack and make their blocks awkward.
There is not much we can do about trying to consistently keep our units safe from Kennen’s Mark of the Storm , though. The way we beat this matchup is to be as aggressive as possible and apply pressure.
LET’S PRACTICE!
Now that you get the idea of how the deck works and how it operates, let's test your decision-making skills. Sora and I have prepared three scenarios for you. Now, just to be bluntly clear, the answers presented for these questions are subjective to our takes. With that being said, please use the following to try and test yourself.
SCENARIO #1
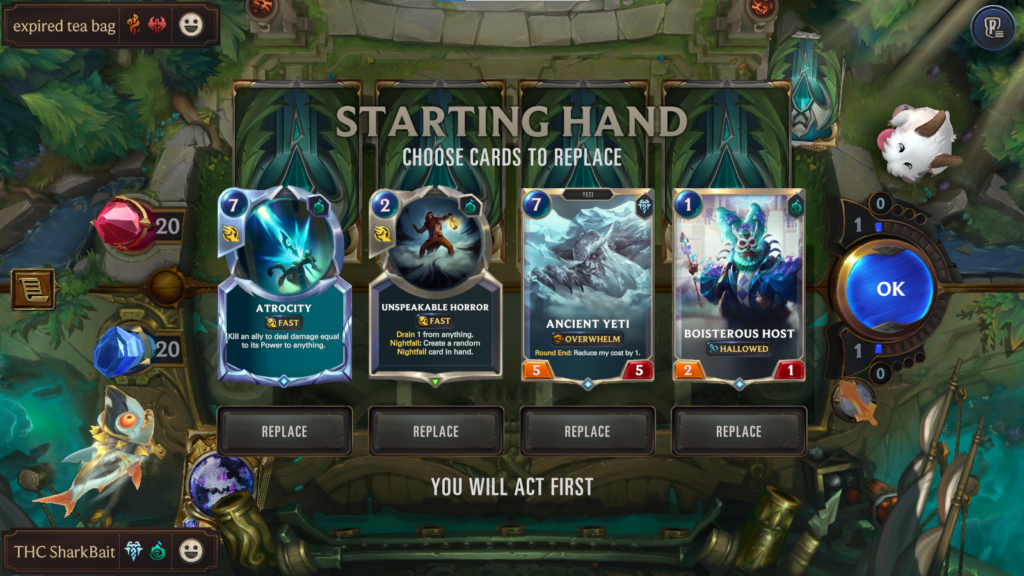
For our first scenario, we are up against our friend Raraku, who is using Pirates – Miss Fortune Twisted Fate. In our mulligan, we see an Atrocity, Unspeakable Horror, Ancient Yeti, and Boisterous Host.
What are the cards that we keep and what do we replace?
HALT!
If you answer that we keep Boisterous Host and throw away everything else, good job! For this matchup, we want to find our early-game units or Gwen to survive the opponent's aggression. Unspeakable Horror can also be a keeper but we decided to replace it in this game, to find our units or better removal like Vile Feast.
SCENARIO #2

Alright! This is an image of a game that we took during our climb. We faced this unique deck called Infinite Akshan, a combo deck. It is round four and both of us have four mana to work with. We played Fireth, Reaper of the Sands because we have the attack token. We have a 3|1 Tusk Speaker in play. The opponent has no units on board, with four mana up. Our hand is a Tusk Speaker, two copies of Sejuani, a Stance Swap, and an Atrocity.
Which one of these two options do you think we went for? Pan O' Pain or Sandworn Amulet?
STOP!
If your answer is Sandworn Amulet, Sora and I pretty much thought the same thing. The way we were trying to beat this matchup is to go as aggressive as possible before they can find their combo pieces. Also, at this point, the only real punishment that they have is Vekauran Vagabond as a Fearsome blocker, which they only have three copies of. And even still, Sandworn Amulet is the better Equipment to support our Overwhelm-heavy hand as it provides more attack buff than Pan O' Pain.
Scenario #3

Alright! This might be a tough one. Sifu versus student sparring, with Sifu on Katarina – Gwen. It is round five. Here's what we know:
Our opponent has a 5|4 Gwen with Overwhelm from Fishawhack and a Boisterous Host on board. They have two mana up and a visible Pan O' Pain in their five-card hand. They have zero Hallowed Stacks and are at five Health.
We have three Hallowed stacks and are at eight Health. The units on our board are two Ruthless Raiders and a 3|1 Tusk Speaker. Our hand is two copies of Inner Beast, a Stance Swap, and a Sejuani that's still two Nexus strikes away from leveling up. We have four mana to work with.

We used our Stance Swap here. The question is what Stance do we go for?
And who do we give it to?
WAIT!
After some careful thought me and Sora both agree that Bear Stance onto a Ruthless Raider is the correct play here, giving our Raider a +2/+2 buff to soak up the Overwhelm damage coming from the opposing Gwen. With our board, we figured that lethal is achievable on our next attack round. If the opponent develops, then they’re giving us an action to play a defensive Sejuani as an answer. In addition, Bear Stance onto a Ruthless Raider plays very well towards a top-deck Atrocity. Next round, we have exactly enough mana to send our 5|3 Ruthless Raider towards the opponent's Nexus for lethal.
CONCLUSION

And that concludes our deck guide for Gwen Sejuani. This is definitely a relatively good pickup to bring on the ladder: one of the best LoR decks, of the "easy to learn but hard to master" type. We highly recommend this deck for those who are looking for something refreshing and chill (pun intended).
Hopefully, you've learned something from this guide. If you have any questions about the deck, our socials are listed below.
Good luck and have fun smashing the Nexus!
SharkBait
Twitter: @CosmicSharkBait
Facebook: fb.com/sharkbaited
Discord: SharkBait #2404
Sora
Twitter: @SoraIsMeh