


Welcome to Drafting
Howdy folks, and welcome to this introduction to LoR’s draft mode: Expeditions!
Drafting is a difficult game mode to get into, and Expeditions being pay-to-play makes the entry barrier higher. This guide will walk you through all the steps required before you actually face your first opponent: how Tokens work, how Drafting works, several rules of thumb about what to Draft, and how to build a solid curve. We'll close with a couple of gameplay tips to improve your odds at doing well in your next Trial.
Before we get into the thorny topic of entry fees, and before we sink our teeth into the ins and outs of drafting, let me first try and sell you on the good stuff that Expeditions have to offer.
The Good Stuff
The biggest thrill of Draft modes is endless variety: no two matches will ever be the same.
You play with a new deck every time, and so does your opponent—games are always different and fresh. While the Constructed meta can get a tad repetitive/predictable/stale sometimes, Expeditions have an endless supply of curve balls to hurl at you.
Then there's something of a rarity when compared to other CCGs: with the Token we get from the Weekly Vault, we can draft twice per week. Since the Token is trivially easy to acquire (you just need to get the Vault to level 2), those two drafts are practically free. And we get substantial rewards on top, even if we perform poorly!
I don’t think the system is ideal, mind you. As I’ll go into detail later in this guide, I believe that the current system of paywalls/payouts is overly complicated, adds too much friction, and I’m dead certain Expeditions would be better without them. My gripes notwithstanding, one Expedition per week is indeed free. And if we do very well (or we hoard a few Tokens) we can unlock the All You Can Draft Buffet for the rest of the week, and play to our heart’s content.
Last but not least, draft modes are inherently fair: we all have the exact same odds of bringing a killer deck to the fight.
Calling it a level playing field would be a bit of a stretch, though: This ain’t no smooth plain field, at all. Sometimes the drafting algorithm will offer us nothing but poro poop, and that’s about it. But for every time we have to make do with a pile of steaming elnuk manure, we’ll strike gold later on. On average and in the long run, we’re all playing at sea level, so to speak.
But then there’s also the matchmaking algorithm. Its inner workings are opaque and undisclosed, but there’s a hidden MMR that tries to match us with opponents of similar skill. Depending on queue times and number of wins you may still confront higher-skilled players, but the game does strive to give us a fair chance.
The Bad: Pesky Paywall & Poor Payouts
It’s not all unicorns and rainbows unfortunately, so let’s tackle the ugly: Expeditions is the only game mode in LoR with an entry fee, and on top of that it has a rather convoluted “Must Pay for the First Three Courses, then It’s All You Can Draft Buffet” weekly rule.
To understand why things work this way, we need a bit of Ancient History. Back in the Old Days of Open Beta, there was a strict weekly cap to how many wildcards a player could buy in the Store: No more than 3 champion wildcards per week.
Weird as it may sound in a world where Capitalism is a thing and Hearthstone is King, one of the pillars of LoR’s original vision was that Riot didn’t want players with deep pockets to be able to buy a huge/full collection on day one.
There were two reasons for this. On the one hand, the Devs didn’t want the deep-pocketed to have an advantage over F2Peers. On the other, they wanted both to slow down how fast players could crack the meta, and to increase deck diversity. The rationale was that by limiting the rate by which we could buy cards, it would take a longer time for the meta to be solved, and players wouldn’t be able to switch decks in an instant if some deck was suddenly revealed as S-tier.
This vision didn’t pan out for several reasons (which is a topic for another article), and the Store was overhauled to what we currently have, with Riot happy to let players throw money at them and buy a full collection on their first day if they wish.
But one of the ancient “No More Than Three” limitations remains to this day. If you want to play more than three Expeditions in a given week, then:
- You must pay for your first three Expeditions that week (with Tokens, Shards, or coins), and you receive rewards for these runs based on your performance,
- After you complete your third paid Expedition in a given week, you reach Open Play—all subsequent Expeditions that week are free to enter and give you no reward, even if you’d rather pay for them and play for rewards.
The second rule stems from the Old Days. It was created to avoid players circumventing the “Can’t buy more than 3 Champs per week from the Store” rule by throwing cash at Expeditions and getting a full collection via Expedition rewards.
I strongly believe this is an overly convoluted system that goes against the grain of how generous LoR is in every other aspect (Expeditions is the only game mode with an entry fee), and which adds unnecessary friction to what is without a doubt the most complex (and most fun!) game mode. In short, I’d love Riot to just scrap this system and make Expeditions free to play.

Anyway!
History lesson and rant over. Let’s get into how Tokens work!
(For the purpose of this Introductory Guide, I’ll assume you are a Tokens-only player. There’s an Appendix at the end of this article with a bit of number-crunching on the topic of whether the Risk/Reward ratio of paying with Shards is worth it. The short version is: “Don’t.”)
As mentioned above, the Weekly Vault includes 1 Token as long as you reach Vault level 2. The first three Expeditions in a given week are pay-to-play. You can hoard as many Tokens as you want, but you cannot pay for more than 3 Expeditions per week, even if you want to. That’s to say, if you save 20 Tokens, and assuming you get 1 Token per week from the vault, then it would take you 10 weeks to spend all your tokens.
Each of the pay-to-play Expeditions consists of two runs (called Trials). In each Trial you draft a deck (a lot more on this below), and play a Gauntlet run. The Trial ends when:
- You reach 7 wins (the maximum you can get—congrats, you’ve won!), or
- You suffer two consecutive losses before your sixth win, or
- You lose when fighting for the 7th win.
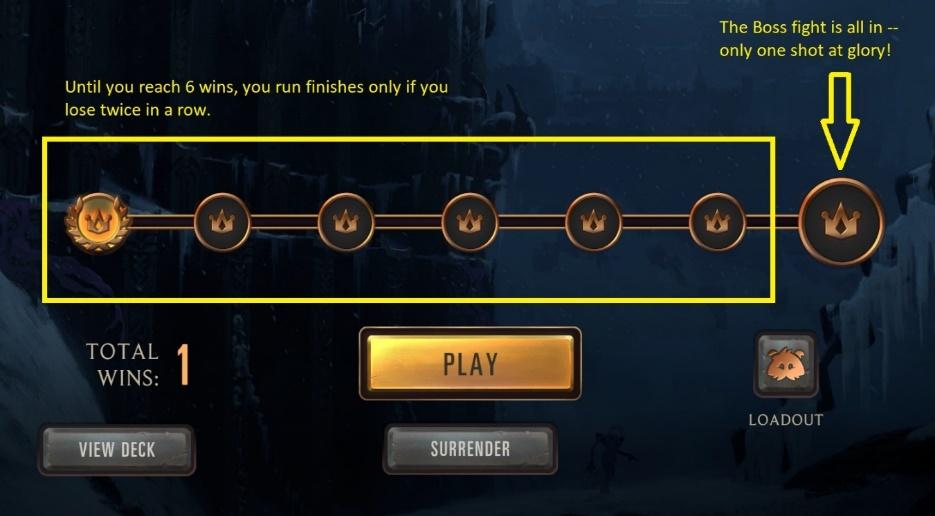
Since each paid Expedition consists of two Trials, you get rewards based on the number of wins of the Trial where you performed the best, regardless of how many wins you got in the other. That means that you get the exact same rewards in all the following cases:
- Going 5 wins in the first Trial and 3 wins in the second Trial, or
- Going 1 win in the first Trial and 5 wins in the second Trial, or
- Going 5 wins in the first Trial and 5 wins in the second Trial.
- In all the above cases, you get rewarded for 5 wins. It also means that, if you get to 7 wins in your first Trial, you can forfeit the second Trial if you wish and get the max rewards anyway.
The base rewards for paid Expeditions are substantial (an Epic Vault), even if you go 0-0. What’s more, if you are not interested in Expeditions, you can spend your weekly Token and claim the rewards for going 0-0 by auto-surrendering the whole thing with just a couple of clicks. The main goal of this guide is to encourage you to actually play, of course, but if Expeditions are not your thing, at least be sure to claim that juicy Epic Vault.
After your third paid Expedition in a given week, you reach Open Play. Expeditions become free for the rest of the week (you can play as many as you want), there’s only one Trial per Expedition, and you get no rewards.
All Expedition games give you bonus XP if you perform well (the better you perform, the bigger the XP bonus.) This XP bonus is the same for paid and free Trials.
Last but not least: It’s not stated anywhere, so there’s no guarantee this will always work, but thus far we’ve got a Token refunded every time there’s a Patch with new cards, as long as there’s a paid Trial in progress. That means that, right before a Patch, you can pay for an Expedition, finish the drafting portion, and just wait for the patch to hit. The current Trial will be forfeit (with a 0-wins record). 1 Token will be refunded, but you’ll still be able to play the second Trial (with the new patch’s cards) and be rewarded according to how many wins you get.
The Draft - How Things Work
Alright! You pay your Token, you jump into your first Trial… time to get down to the nitty-gritty, with a couple of big caveats for everything we’ll say from here on.
First and foremost, drafting is very nuanced. There’s a ton of considerations, context is king, and there’s no way to codify things into a few set-in-stone axioms. What follows are broad rules of thumb, aimed at keeping things simple—as you gain experience, you’ll likely want to, and probably should, trust your guts and hard-earned experience more than these guidelines.
All in all, drafting is quite a bit about avoiding bad choices, rather than making great ones. Picking an awesome card and a horrible card is, more often than not, worse than picking two mediocre cards. And never forget you are drafting a deck, not just cards. Your curve matters a lot; ignore it, and you risk ending your run soon.
So, let's get down to brass tacks now. When assembling our Expedition deck, the Algorithm will offer us choices from clusters of cards called Archetypes. These are groups of cards that, at least in theory, work well together, although as we’ll note abundantly in the following sections our Algorithmic Overlords sure have a weird way of defining “synergy”.
Click here for the official Archetypes, maintained by Riot Dev DeadboltDoris.
Before the first game of every Trial, we’ll get to make 14 choices from these Archetypes, adding a total of 30 cards to our deck.
Pick 1: A choice to pick a Champ plus two cards, out of a selection of 3. Notice the Archetype names above each choice.
Pick 2: Pick second champ plus two cards. Similar to Pick 1, each choice will contain cards from a single region.
Pick 3, Synergy Pick: The algorithm will offer us a choice between three different Archetypes. The cards offered are supposed to be synergistic with our previous picks, but as said before our opaque Algorithmic Overlords have mysterious ways of understanding “synergy”.
Notice that from now on there will be two cards per choice (instead of three, like in the Champion picks), each choice can now include cards from different regions. Expedition decks can have up to three regions: up until our sixth pick, we'll often get the choice to draft a third region -- after the sixth pick, we will only be offered regions we already have, never a new region.
Pick 4, Wild Pick: This is when the Algorithmic Overlords throw us a curve and give us some non-synergistic choices, but it’s not rare to see one or more of the Archetypes we’ve taken already. As with pick 3, each choice has two cards, can include cards from two different regions, and if our deck has thus far only two regions we may get offered cards from a third region.
The remaining odd picks (picks 5, 7, 9, 11 and 13) will all be Synergy picks.
The remaining even picks (6, 8, 10, 12 and 14) will be Wild picks.
The more you take a specific Archetype, the higher the odds you’ll see it in future picks. Do remember our Overlords’ definition of synergy is sketchy at best, though.
The “Max 3 Copies” rule for Constructed does NOT apply for Expeditions. You can pick as many copies as you get offered, if you want.
Trade Pick 1 (step 15 of 15): The last step of the draft, right before your first match, is a chance to swap a card in your deck. The card offered will always be from your current regions. Usual caveat about our Overlords’ fuzzynergy applies.
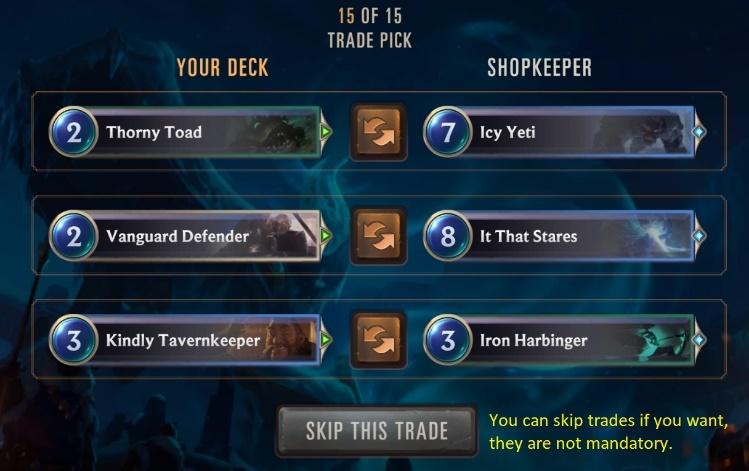
After this trade, you’ll be ready to face your first opponent.
As you progress in your Trial, you will be offered more Trades. All Trade Picks are optional, and you can skip them if there’s nothing you want to swap. Trades may include champions (always trading one champ for another champ).
If you reach 1 win you'll add a third champion, and a fourth champion if you reach 3 wins. During your run, you will face players with the same number of champions in their deck.
So, What Do We Do?
Basically, keep it simple (which is easier said than done, mind you!). Pick solid units and try to stick to your original Archetypes/Regions, since there’s a higher chance you’ll get offered cards that work well with cards you already have.
A bit more specifically:
Write things down. Take note of which Archetypes you pick early on, there’s no way in-game to check them later.
Focus on units that are good “in a vacuum”, that’s to say units that:
- Can hold their own in combat: good stats (rule of thumb, you want +1/+1 per mana point), aggressive keywords (Challenger, Elusive, Overwhelm, Quick Strike), and/or
- Have good effects when entering the board (card draw, for example).
The worst card is the one you cannot play. If something requires too much synergy and/or is too conditional, it may be a Constructed staple but it’s likely Expedition trash.
In a similar vein, Questions (cards our foe has to respond to) tend to be better than Answers (cards we play in response to our opponent's play). And two mediocre/okay cards are often better than a great card plus a horrible card. In general, Drafting tends to be about raising our deck’s floor, rather than its ceiling. That’s to say, we usually want to improve your worst-case scenario rather than your best-case scenario.
As you advance in the draft, mind your curve (we’ll discuss the specifics a bit further down). By pick 10 and later, and within reason, curve matters more than card quality. Remember: ain’t no card worse than the card you can’t play.
Our Algorithmic Overlords work in opaque and mysterious ways, but they seem to be fond of rewarding consistency: If you keep choosing a specific Archetype, it’s more likely to show up again, thus allowing you to pick cards that should work well together. In general, stick to two (or just one, if you get so lucky) regions, rather than branching into three (basically "staying in your lane", so to speak)
For the record: It’s perfectly fine sometimes to round up your deck with a third region. Or to go for a more powerful Archetype if what you start with is kind of weak. As you get more experienced you'll sense when to pivot (ditching one Archetype/Region and going all-in on another) and when to stay in your lane. But when starting out, "The more the merrier" is probably a safer approach than "Variety is the spice of life", so to speak.
So, in short:
- Early on (until pick 8 or so), value card quality the most, if similar quality check your curve, if similar quality and cost then try to stay in your lane (stick to previous regions & archetypes)
- Later on give priority to your curve, then card quality. By this point staying in your lane will be irrelevant.
Last but not least, remember all of the above are broad rules of thumb that seasoned players will very much like to ignore.
By the Numbers
Alright, let’s get a bit more specific, for which we’ll sprinkle even more salt to these recommendations. The tables below are taken from the LoRGuardian.com website, which gets its data from their own deck tracker. That means their data is not a random sample (players who use a deck tracker are likely more dedicated than average, have a higher MMR than average, etc.).
The data is also for the month when Beyond the Bandlewood was launched. The meta can change with each patch: even patches that release no new cards may have tweaks to the Expedition Archetypes. And last but not least, during the launch month the algorithm is much more likely to offer Bandlewood Archetypes, which is something done on purpose by the Devs because, not surprisingly, players want to play with new toys!
That being said, lo and behold, a table with all the Champs, filtered by 7-wins decks (i.e. considering only decks that reached 7 wins), ordered from most used to least used. In other words, the higher a champ is in this list, the more likely they’ve been in a deck that won its Boss fight.
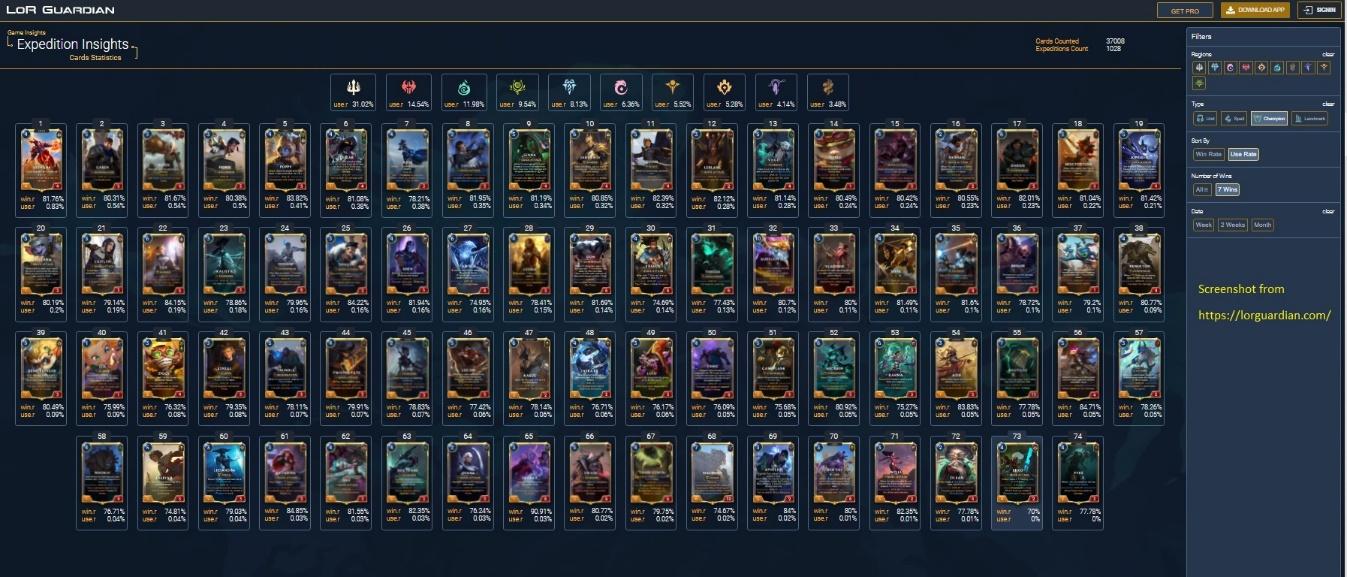
Anything that catches your eye?
If you’re thinking: “Interesting… I would never have imagined Fiora being a stronger Champion than Viego in Expeditions,” then you are onto something.
If you’re thinking: “Well, Demacian champions look kinda strong,” then congrats: You have pretty much graduated with honors from this quick introductory course! =)
No, seriously: that’s takeaway Numero Uno. When possible, pick Demacia.
Really. In the first game of every run, we have 2 different champs in 30 cards, so surely not drawing a specific champ is more common than drawing them. Therefore, the champs themselves, no matter how strong, are not such a big factor in how a deck performs (even if some champs, like Viego, are answer-or-die strong).
What the champs do, though, and specifically the first two we pick, is make their Regions and Archetypes available for later picks.
So what the above Champions list really shows is that Archetypes with Demacian cards are on average better than, say, those that include Targon.
Want a clearer picture?
This is a similar screenshot, now including all cards (Champs, spells, followers, and landmarks) with the same filter: only 7-wins decks, ordered by most used to least used, therefore these are the most likely cards to be found in a 7-wins deck—only the top 120 cards shown.
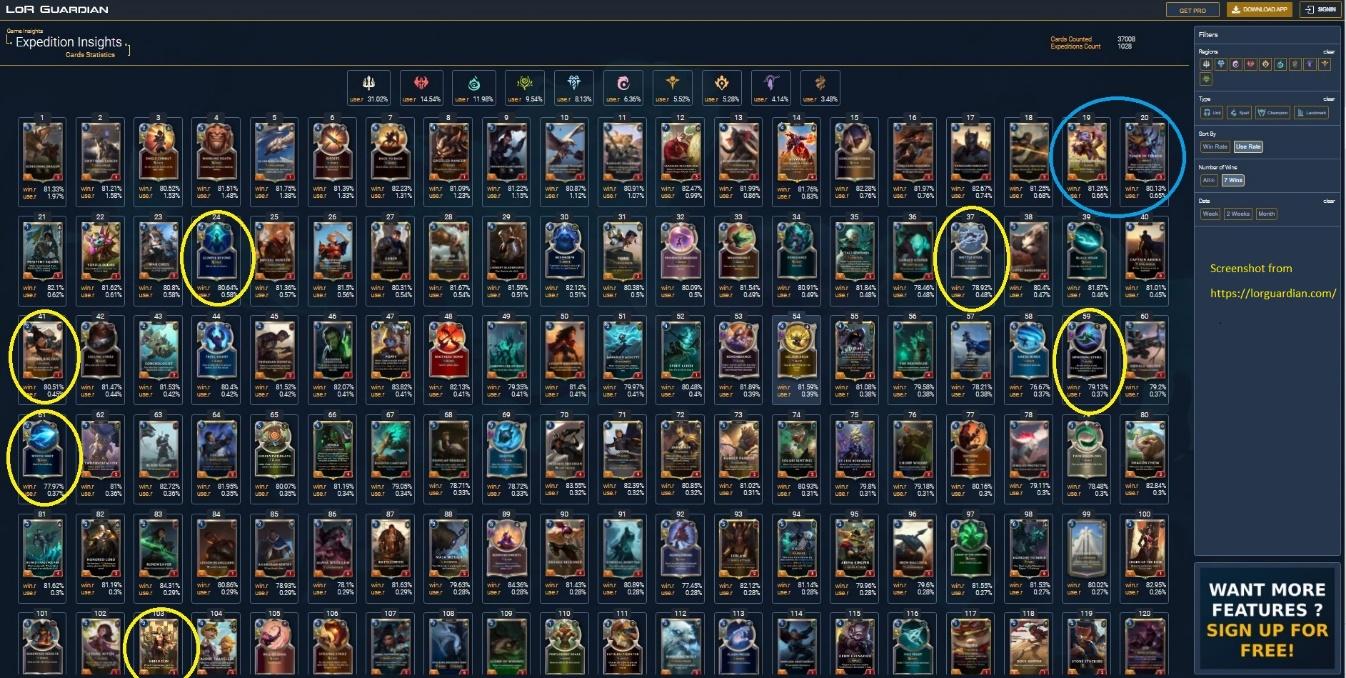
As the top row should amply demonstrate, Demacia is in a tier of its own, followed by Noxus. For added emphasis, I circled the most common card from the other regions—some of them don’t even make the top 100.
For those wanting a crude, very rule-of-thumb-y tiers list, it would be:
First: Demacia, proudly standing far above the rest.
Second: Noxus (although do notice how low Katarina & Swain are on the Champion chart; not all Noxians are equally strong),
Third: Shadow Isles, Freljord, Bandle City,
Fourth: Ionia, Shurima, Piltover & Zaun,
Finally Targon, Bilgewater.
With the generous pinches of salt mentioned earlier, let’s point out some other broad trends:
- There are very few cards that cost six or more, and no card above nine mana.
- Five-mana cards are overrepresented among the top 20 cards (and the two best cards are five-drops) but notice how there’s not that many of them overall.
- The bulk of the cards are 2-3 mana followers.
- There’s about 30% spells in each row, and none of them is too fancy: mostly Removal, Protection, Combat tricks. In particular, notice how cards like Deny or Ruination, which tend to give rookies nightmares, don’t make the cut (even if they are solid cards, mind you).
Curve Stomping
A good curve is crucial. There are many ways to assemble a killer deck, some of which deviate a lot from the recommendations below (as we’ll soon see in a few examples), but as a first approach aim for:
Early game (One- and Two-drops): Between six and ten, depending how aggressive you want to be.
Three-drops: Draft about four-eight of these. Missing your third turn usually spells disaster, and that's why the early game matters so much. When in doubt, grab the three-drop.
Four-drops: Between four and six should be okay. These tend to be the smaller of the big guns, so to speak.
Five-drops: The big guns, between two and four are usually enough, although be sure to remain flexible: as shown above, some of the best Expedition cards are five-drops. You can’t have too many Screeching Dragon s!!
s!!
Six-drops: You want somewhere between zero and three really big guns, depending how slow you want to go. In this slot, you usually want to lean heavily towards the six-drops: Having two six-drops and one eight-drop is okay (as long as they are strong cards and the rest of your curve helps you stay alive), whereas having two ten-drops is asking for trouble.
About ten spells, giving priority to:
- Removal spells like Atrocity
 , Double Strike or Siphoning Strike,
 - Combat tricks like Brittle Steel or Troll Chant, and
- Protection spells like Riposte or Back to Back, which are also good combat tricks.
 , Double Strike or Siphoning Strike
 ,
, or Troll Chant
 , and
, and or Back to Back
 , which are also good combat tricks.
In case of doubt, lean towards “Cheap”, which for LoR spells means “three mana or less”.
Three Examples
Now, let’s see three examples of seven-win decks.
To drive home the concept that these are all broad rules of thumb, let’s start with this abomination:
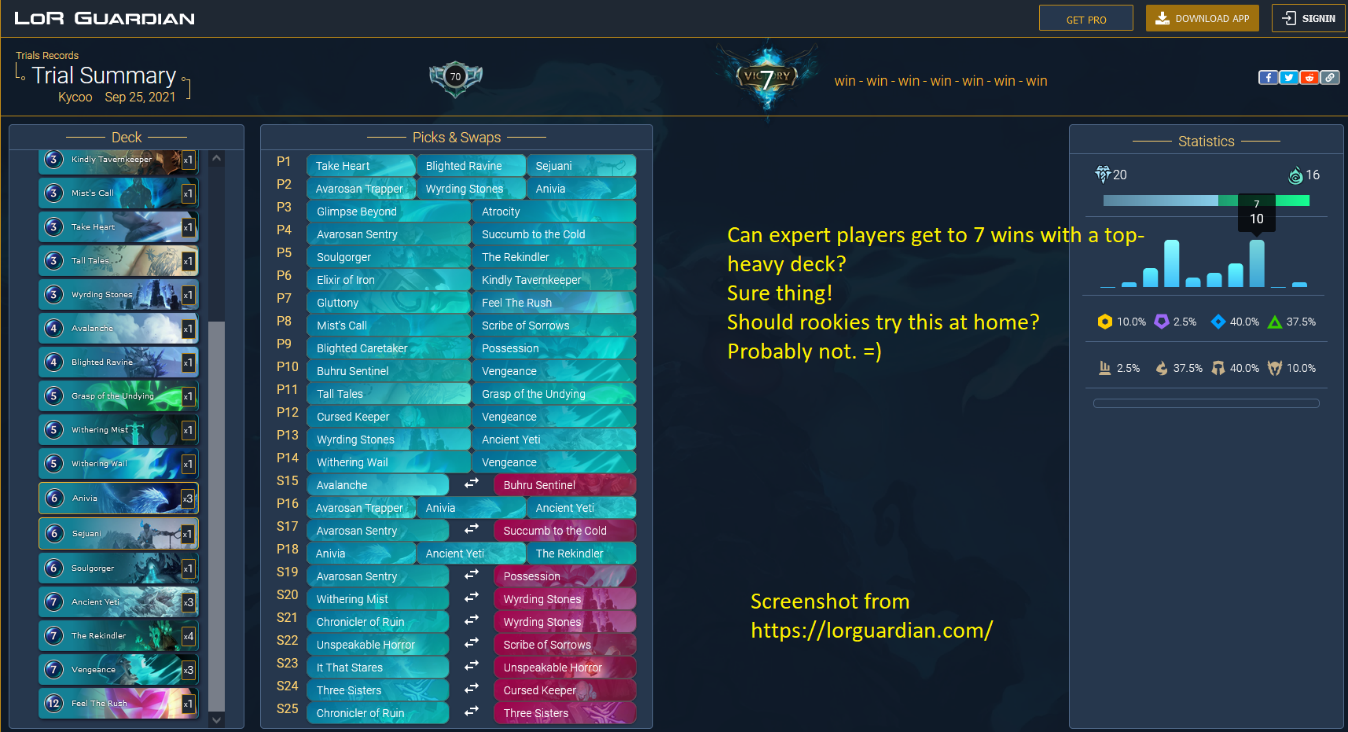
So: yeah, you can trample over your foes with a very top-heavy deck, and as your scars grow numerous you should most definitely try to…
… but unless you know what you are doing, trying to draft and pilot such monstrosity may backfire.
Badly.
Let’s check now something closer to the previous recommendations:
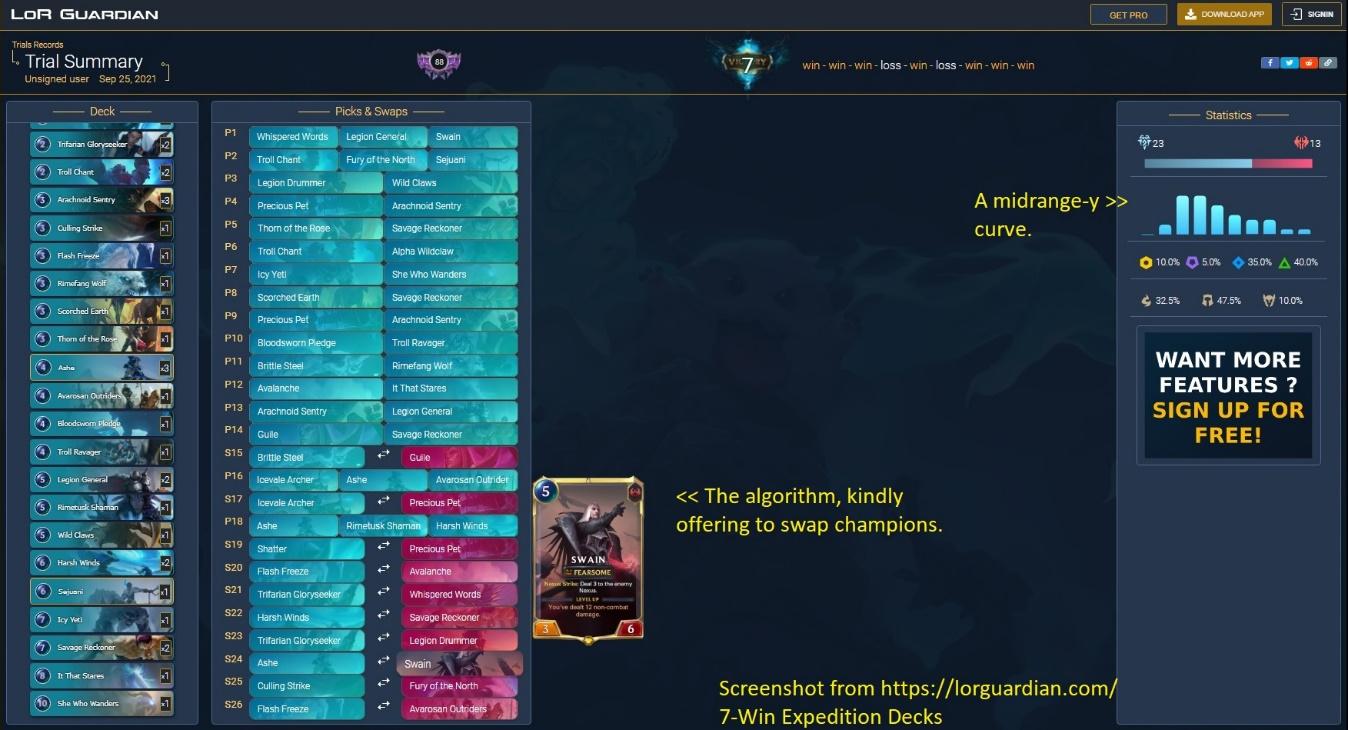
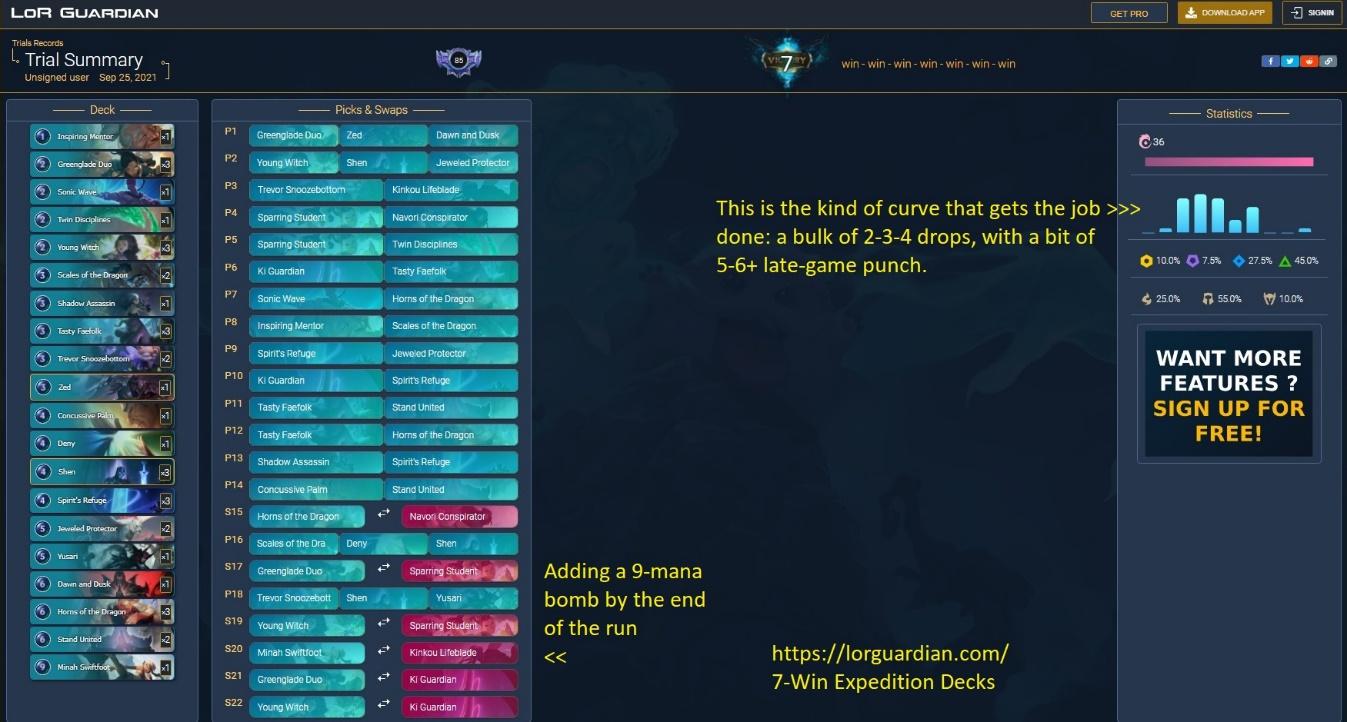
This is the kind of curve that gets the job done.
By the way, notice how this deck was born as a Swain deck, but later pivoted into an Ashe deck, including a Trade near the end where the Algorithmic Overlords kindly offered to swap Swain for Ashe. This won’t happen often, and I would not recommend trying to force the algorithm in that direction, but is the Overlords’ way of rewarding consistency.
For a third and last example:
Notice how it’s all Ionia. Mono-region decks are not the norm, but they do exist. Also notice how this deck’s pilot included a powerful top-end card, Minah Swiftfoot , later in the run, when they already had a rock-solid early curve.
Also: you can see how all three decks, even with such different curves, have roughly the same spell ratio (about 30%). Units are what win you the game, spells give you an edge and let you be mana-efficient: You won’t always be able to play your units on-curve, so you’ll often accumulate spell mana.
Remember that, in general, units are your questions (“Here’s unit X; what are you gonna do about it, dear foe?”) while both units and spells are your answers (“Gee, that sure is a nice X; would be a shame if Y happened to it.”). There may be wrong answers, but there are never wrong questions.
And After the Drafting is Done…
Playing the deck you’ve just assembled is, surprise surprise, kind of important. We won’t get into details in this introductory guide, so to wrap things up here are a few tips:
First and foremost, be sure you know everything in Aiden Thorne’s New Player Guide inside out! Don’t jump into Expeditions until you have a good grasp of LoR’s mechanics, and above all how the Stack and passing works.
As soon as a game starts, mute your opponent. If Expeditions are a new game mode for you, make sure you reduce stressors as much as you can.
Pace yourself. Take your time. Do you have enough mana for what you want to do this round? Can you save spell mana for the next round? Hands and board states tend to be messy, with cards you may not be familiar with. Your foe’s deck is unpredictable. Don’t play on autopilot, make sure you’ve considered all the information available to you.
Having said the above, when in doubt, draft and play aggressively. You want to apply pressure as soon as possible, take the lead, and snowball from there. It's perfectly possible to go for a more Control-oriented gameplan, but when starting out an aggressive-midrange-y curve is probably the safest bet.
And go for it. Expeditions are a bit less play-around-ish than Constructed. There are staple cards that with practice you’ll learn to anticipate and outwit, but your foe could have anything, and you just can’t play around every option. For example, it’s a known fact that in Constructed a Freljord player will always have Avalanche by turn three. In Expeditions, more often than not, they won’t. Make ‘em have it.
Tied to the above: When ahead, risk little. When behind, risk lots. Play conservatively if you have the lead, but if you’re losing you’ll have to take risks to turn the tables. Go down fighting!
Think one round ahead about:
- Mana efficiency: Consider whether what you play this round will allow you to spend mana efficiently next round.
- Lining up removal: Can you harm an opposing unit enough this round, so next round you can kill it?
Life is a resource. You don’t always need to block every attack; taking some face damage and keeping a key unit alive and healthy is often a good strategy. Units and spells in LoR tend to have an aggressive slant—if your health is high enough, perhaps it is more efficient to save your blocker and use it as an attacker next round.
Last but not least…
… we learn by doing.
And doing is short for “making many mistakes”, no way around it.
At the end of the day, doing is smarter than thinking. Do think your plays through, do review your games and think what you did right and what you did wrong, but above all do play!
In Closing
That’s all for this guide (or, well, not really: there are a couple of number-crunchy appendixes below, for those that like a numerical approach). For additional insights, you may want to check our article with a Champion Tier List (link), to help you with your first two picks.
Hope you’ve enjoyed this walkthrough, hope you’ve found some of the tips useful (and if not, poke me on reddit or @HerkoKerghans on Twitter and ask me about them!). And if you happend to like this guide, you can find more of my writings on my Riwan Newsletter (link).
May our fuzzy Algorithmic Overlords gift you synergy in abundance, and don't forget: play! =)
Appendixes – A Bit of Number-crunching
Appendix #1: Tempering Expectations
What does “doing well” mean for Expeditions?
Quick math quiz: say we have 100 players of exact equal skill (therefore every match the odds are 50/50). They play Expedition Gauntlets against each other.
Question: More than half the players will lose twice in a row before reaching… How many wins?
Short answer: Three.
Longer answer: Only forty-two of our players will get to three wins or more, and fifty-eight players will end their Trials with two wins or less (in particular, a whooping twenty-five players won’t win a single game and end up going 0-2).
Here’s the breakdown:
Moral of this story/math quiz?
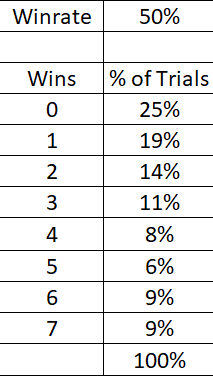 REACHING THREE WINS IS DOING ABOVE AVERAGE AND REACHING FOUR WINS IS DOING PRETTY DAMN WELL!!
If you want to take just one thing home from this guide, this is it: If the majority of your runs end on two or three wins, then you’re doing things right. Yes, you can always improve (and I dearly hope this guide helps you to!), but if you are playing against worthy foes (that’s to say, foes against which you expect 50/50 odds), reaching 5+ wins will be the exception, not the rule.
And against worthy foes only about 9% of your Trials will reach seven wins.
That’s a Trial out of ten, give or take.
If you spend one Token per week and play two Trials per week, then you’ll reach seven wins only once per month.
Corollary: if you frequently browse reddit, do yourself a favor and don’t pay too much attention to the “Made double-seven wins on my first Expedition ever!” posts.
No, it’s not because you alone are horrible and everybody else strikes home runs every time they swing.
It’s because if you match two hundred rookies against each other, one or two of them will nail a 7-7 Expedition (that’s just math), but only those two are gonna brag on reddit. That’s human nature: Nobody posts about their 6-6 Trials, let alone their 5-4, even though they are still very much above average.
Appendix #2: Rewards & Payouts
For every paid trial (whether you pay with Coins, Shards, or a Token) you get an Epic Capsule (which contains 1x Epic card, 2x Rare cards, 2x Common cards) no matter how poorly you perform, and on top of that you get:
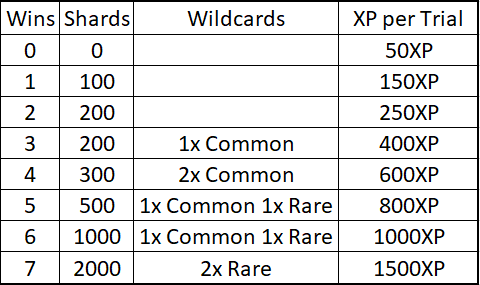
For Shards & Wildcards you get rewarded for whichever Trial you got the most wins, with the other Trial being irrelevant. You get bonus XP for each Trial, though.
In other words, if you go 7-3 you get the same rewards, but less experience, than if you go 7-6.
Is it worth it to pay your entry fee with Shards or Coins?
Depends.
If you are a die-hard Expeditions player and don’t play Constructed then yes: Pay for Expeditions with whatever you can afford. Fun is what matters in this case.
On the other hand, if you play both Constructed & Expeditions and you care about your collection, I’d say no. For an average performance (that’s to say, for an expected 50% win rate), you’ll get on average about four hundred shards (plus whatever you can recoup from duplicates).
Therefore, if you spend six thousand shards on Expeditions, you’ll end up recouping around twelve hundred shards, and earning a bunch of random Rares and Epics that most likely won’t be the ones you need for the Constructed decks you want. Spending those six thousand shards in two champions you do need sounds like a more solid investment (a card you want is worth more than a random card of the same rarity).
If you want to get fancy, this is what's known as opportunity cost: the exact card you want/need/can use right now tends to be more valuable that more cards that you have no current use for.
Still… this ain't no financial advice, so up to you! =)